Translate

Monday 31 December 2018

20mm WW2 German infantry platoon options


With it being the year end and time to look back on 2018, I thought I'd look again at my 20mm German infantry for WW2.  At the start of the year, almost all my WW2 kit was in 15mm or 6mm scales.  However, I had two big incentives to get some completed as a) I had a Battlegroup Market Garden gaming weekend coming up in May and b) I had picked up lots of 1/72 plastic figures, plus some SS infantry from Britannia Miniatures/Grubby Tanks.
 
The core of my BG Market Garden force was going to be an armoured infantry reconnaissance platoon - actually from the Wacht am Rhein book but allowed as they were used extensively around Arnhem.  I decided to create a unit based on a recce platoon from 9th SS Armoured Division.  This comprised 4 Sdkfz 250/1 armoured half tracks, each carrying a 4 man MG34 squad, a command 250/1 carrying a 2 man command team, 2 man panzershrek team and 2 man stretcher bearer team and a 250/10 mounting a PAK36.  I also provided some additional support units in the form of a PAK 40 with Maultier tow, a tripod mounted MG34 with 3 crew mounted in an Sdkfz 251/1 and an Sdkfz 250/8 with 75mm short barrelled howitzer.  Recce options included sn Sdkfz 222, an Sdkfz 250/9 and a sniper (not shown).  Artillery support was controlled by a 2 man FAO in Kubelwagen and the platoon was supported by up to 5 Stug III Gs (excellent value for money pointswise).  Finally, an Opel Blitz truck provides a supply column.  So, an infantry force but only with 30 figures, including 2 observers and 6 figures manning the tripod MG34 and PAK40.  Up against lightly armed airborne troops they were as good as light armour, albeit a little more vulnerable to plunging fire and the 4 man MG team dismounts could be quite brittle, but the unit puts out a lot of firepower.


The main infantry teeth of the platoon, each 4 man team carries an MG34 and a Panzerfaust.  The PAK36 needs to get right up close to kill and serious armour, but is quite effective against half tracks and light airborne vehicles.  The command team of 2 men, Panzershrek team of 2 men and 2 man stretcher bearer teams are very vulnerable, especially if the transport is destroyed (if the vehicle is lost and the d3 hits are distributed 1 per 2 man team, then all will break due to last man standing and the aautomatic pin caused by the loss of the vehicle - oops, that's 4 tokens to take.


The command 250/1 carrying three 2 man teams, plus the Sdkfz 251/1 with tripod MG34 - which can put out a lot of firepower given the chance.  In the background is the FAO and Kubelwagen transport, Sdkfz 222 and 250/9, the former being much more survivable as it is not classed as open topped in the BG rulesets, which the 250/9 is, despite them having effectively the same turret arrangement.


Stug IIIG support, 2 from Britannia/Grubby, 2 Armourfast and a PSC version.  These are tough little beasts, difficult to kill and they pack a good anti-armour punch as well as effective pintle MG34 fire.  Great for taking on those pesky large US airborne infantry squads.


Fire support from the Sdkfz 250/8 75mm howitzer, PAK 40 with Maultier tow and, at the back, an Opel Blitz supply truck.


Having got to grips with a camo smock pattern that I liked for the Britannia/Grubby Panzergrenadiers, I decided to do a fully Gepanzert platoon in Sdkfz 251/1s.  I used the Armourfast vehicle sets with additional modifications from Early War Miniatures.  The 3 main rifle sections each comprise a 5 man rifle squad and a 3 man MG34 team, carried in a 251/1.  The 6 man command section is carried by an Sdkfz 251/10 with a PAK 36.  They are supported by an MG34 team in a 251/1 and a PAK 40 towed by a 251/1.  At the back is an Armorfast Sdkfz 251/9 Stummel 75mm howitzer, 2 Armorfast Jagdpanthers and three Panthers, 2 from PSC and 1 Britannia/Grubby, with a supply column Opel Blitz truck from PSC.  Front right is an Armourfast Sdkfz 251/1 modified with an EWM kit as a 251/3 command transport, with dismounted FHQ stand using Britannia figures. 


The Sdkfz 251/3 and FHQ command team.


The teeth arm of the platoon, three sections, each a 5 man rifle squad and a 3 man MG 34 team, plus a 6 man command team, all from Britannia/Grubby.


The tripod MG34 support team with 75mm Stummel and 2 Jagdpanthers behind.  Firing long range at targets to their front can be devastating for the Jagdpanthers, especially when lurking in woods or town ruins.


Panthers, pack a real punch and are heavily armoured to the front, but expensive and vulnerable from the flanks!


PAK 40 and 251/1 tow both from Britannia/Grubby, with a PSC Opel Blitz supply truck behind.


Engineering support for either platoon, mostly from Britannia/Grubby.  On the left an Sdkfz 251/16 Flammpanzerwagen, capable of firing flame out of both sides, twice each turn.  I made good use of this clearing a town of 30 corps infantry in the BG Market Garden weekend.  On the right is an Sdkfz 251/7 Pionierpanzerwagen.  Between the vehicles is an engineer section comprising a 5 man engineering team with additional man pack flamethrower and a 3 man MG34 team.


Some assorted late war feldpolizei, including a motorbike despatch rider, motorbike and sidecar, three man team and a feldpolizei directing traffic.


Front left is the "Hitler" vignette, which appears to be based on the last know photograph of him decorating 15 year old boys in uniform, then US prisoners being directed away from the battle area and finally a field execution scene to indicate "Backs to Berlin" or "To the Last Bullet".


The "Hitler" vignette from Pegasus.


This unit could represent grenadiers of volksgrenadiers, in this case transported by an Opel Blitz bus from Britannia/Grubby.  The figures are mainly plastics from Italeri and Caesar, chiefly the Caesar Panzergrenadiers Ardennes 44 set and German Army with Greatcoats sets.


Finally, for now, another grenadier or volksgrenadier platoon, again using Caesar or Italeri figures with a Zvezda command team in greatcoats plus an observer team with scissor scope.  At rear right is a Britannia/Grubby sniper team and on the left an alternative FHQ team.  To their front is a medic figure evacuating a wounded man.


Based on this trawl through my 20mm WW2 German troops, it looks like I'm missing some late war Pz IVs and suitable figures for a Volksturm platoon.  Not shown today are the Kriegsmarine and Gebirgsjager platoons suitable for most of WW2 that I've posted on previously, as well as the early/mid-war Fallschirmjager suitable for the Low Countries/Norway/Crete and DAK suitable for North Africa that I've still to photograph properly.

As ever, thanks for looking and have a very Happy New Year, all the best for 2019.

Monday 24 December 2018

28mm Colonial British Infantry (Zulu Wars)

And now for something completely different …… !  I picked up some assorted 28mm Zulu Wars British infantry at various shows over the last couple of years, scratching an itch to play out Rorkes Drift and Isandlwana, battles which captured my imagination as a boy and, as I found out in later life, also fascinated my father.  Little did I know that one of his treasured tools kept in the shed was a cold chisel that he had made from a piece of an Assegai he had bought as a child in a 1930's junk shop.

The assorted figures I picked up at shows turned out to all be from Black Tree Design and I've supplemented them with a box of Warlord plastics, which match very well.  I've still got 8 figures to assemble and paint, plus a pack of Perry plastics, so enough for 70+ figures.  I'm still experimenting with rules, but I'm currently leaning to sets using 10 figures plus an officer to represent companies.


So here are three companies, each 10 infantry and an officer, plus 2 senior officers.  The third company at the back is made up of troops largely in non-combat roles, so this unit will be broken up and allocated out to make up other units in smaller numbers as the plastic figures lend themselves to groups of 8.  I will also add some other officers and characters from the Black Tree Design range and possibly others from Redoubt and Empress.


I've painted up a couple of figures in blue uniforms to represent the commissariat, one is clearly an officer using his revolver, the other is handing out what looks like an ammo pouch.


The figures all need gloss and matt varnish and basing/flocking, which I will set about after Christmas.


I'm quite pleased with how they have turned out and will be adding more soon, as well as some mounted troops and irregulars.

Thanks for looking and have a great Christmas everyone.

Friday 30 November 2018

20mm WW2 German Gepanzert platoon

A quick post as I've just realised I've posted nothing for a month.  I finished these a couple of weeks back and they have already been pressed into service for my Gepanzert DAK infantry platoon in the BG Torch campaign Will and I are playing in.  Against dug in US and French infantry backed up by 75mm and 105mm artillery batteries, they were spectacularly unsuccessful.


All are Armorfast kits (purchased as a set from EWM) with 2 vehicles crewed by Britannia SS infantry and 2 from EWM.  Stowage is a mix of EWM and Sgts Mess.

Vehicles crewed by Britannia SS figures.


EWM crews.  Not my favourites, but they do the job.


I've got quite a bit of 20mm WW2 kit to post pictures of - actually making and painting them faster than I can post.  Then, I've also taken another foray into 28mm - more on that shortly.

As ever, thanks for looking.

Tuesday 23 October 2018

Battlegroup Torch campaign game 2

A couple of weeks back, Will and I played out the second game in our Torch campaign.  All our map moves had resulted in the allies making a series of strategic withdrawals, in an attempt to pick fights on their own terms and at better odds.  This led us to the second of the pre-planned scenarios from the Battlegroup Torch campaign rulebook, Blood and Gore.

My plucky Pz IVs moved up astride the road, dealing with Will's Crusaders hull down on the right flank.  Sadly, one of the Pz IVs was KOd by mortar fire and a failed morale test


By turn 4, a platoon of Pz IIIs and a Pzgrenadier platoon in Sdkfz 251s had arrived.  Tanks and infantry dealt with Wills forward infantry deployed in rough terrain on the left in the photo below.  Another Sdkfz had charged up the road, and sprayed MG fire on the 6pdr deployed in an olive grove adjacent to the road, while everyone else tried to suppress the 6pdr and remaining Crusader in the woods rear left.  In the distance, Will's Valentine tank reserves were lumbering forwards on and adjacent to the road.


Pzgrenadiers skirmishing with Will's infantry in the vinyards.


Sadly, Will's 6pdr in the woods led a charmed life, unlike my panzers, and the Valentines advanced in line abreast causing mayhem amongst my 251 transports.  Even more devastatingly, I consistently failed to get a comms test through from my FHQ, so the lovely 150mm battery in support managed to fire just once.


As chits accumulated, they seemed to be 4s and 5s for me and 1s and 2s for Will, and eventually my force reached it's breakpoint.  Another allied victory snatched from the jaws of defeat.  So the next round of map moves will kick off next, with the allies getting more reinforcements, so I expect some meaty battles to come.

Thanks for looking.

Saturday 20 October 2018

Arctic Strike 2018

Last weekend saw me travelling across the country to Grimsby for a game of Cold War Commander.  Our hosts, Grimsby Wargames Society were excellent, so a big thank you to Steve Graham, Andy Hamilton, Andy Bruce and Danny Malone.  The game, Arctic Stike, was organised by Richard Phillips, supported by umpires Richard Crawley and Steve Graham, so a big thank you to them, especially Richard P for his organizational genius.

The game was a continuation of a game played in 2013 at Dungworth near Sheffield, taking up a day or so in game time after the previous game.  Soviet motor rifle troops were advancing south from northern Norway, as well as making landings around Bodo and advancing east in an attempt to link up with the main thrust along the north-south axis.

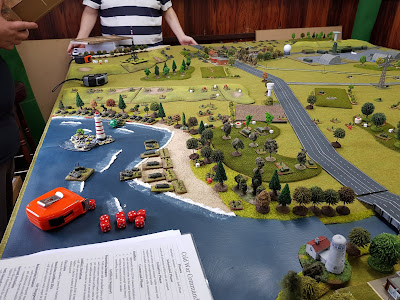
This is the table for the thrust from Bodo, looking west, so Bodo itself is off the end of the table and the Soviets were to advance towards the camera.  There were a variety of beaches along the southern edge of this table (to left in photo below) along which amphibious troops could attempt landings.


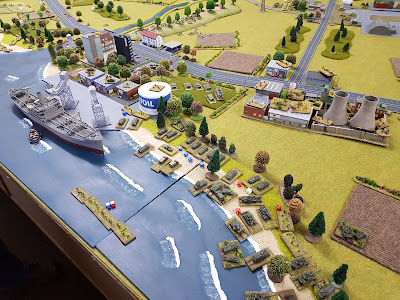
A vital NATO resupply base/harbour on the southern table edge, with a freighter/transport loaded with Canadian reinforcements.  Richard Phillips (Fieldsway Scenics) did most of the terrain for the tables - an immense effort and really well done).


Slightly further west, showing potential landing beaches.  The river mouth shown would turn out to be a vital NATO stop line.  One of my terrain items is the lighthouse.


The main west-east highway with one of the NATO airfields in the far left.  This airfield was too close to the Soviet deployment zone and abandoned by NATO at an early stage.


The abandoned airfield.  Most of the airfield terrain was the work of Andy Miles.


The other airfield on this table was hotly contested in the end, but this was more in the NATO rear area.


Looking south from the second airfield towards the docks.


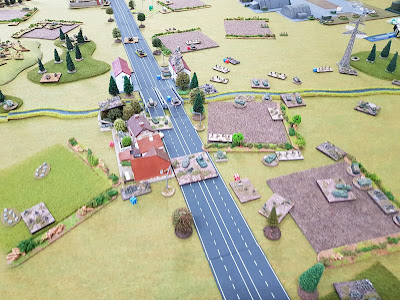
The main west-east highway at the NATO end of the table.  The small BUA and road bridge in the middle distance would be hotly contested.


The NATO forward deployment area.


Then on the north-south table, this view looks north towards the Soviet table edge.  Again, amphibious capable beaches line the western (left hand) table edge.


Airfield in the NATO rear area, with runway by Richard P projecting out into the sea, based on a real world example in the area.


The NATO forward deployment area looking east towards Sweden and Finland.


View from the Soviet table edge looking south.


Pete Spencer's excellent helicopter armada, now part of Rodger's VDV forces.


Soviet air assets.


More Soviet air assets.


NATO air assets.


More NATO air assets.


Richard P's most excellent Aist LCACs.


I was NATO commander, which essentially involved me in allocating sectors to the mixed force pool available.  On the north-south table, I asked Rodger to hold the front line with his mottly collection of Norwegian regulars and home guard, while Mark's US high-tec infantry in dune buggies was tasked with holding the rear area, offering long range support to Rodger, but also securing the airfield and coastlines.  The big surprise on that table was to be a flank march by Simon's Finns, launching a spoiler attack into the Soviet eastern flank at an opportune moment.

On the west-east table, I asked Mark Julien, with his CAST battlegroup and Luxembourg contingent ("Luxy Boys" throughout the weekend) and Neil's 82nd Airborne to hold the front line.  I tasked Andy T's Royal Marine Commando Arctic Warfare contingent to provide rear area security for the airfield and to support Neil's 82nd if needed.  My USMC provided two marine infantry battalions to hold the dock area and secure the beaches, with a company of engineers at the rear river crossing and some TOWs to support Andy's RMCs at the airfield.

The plan seemed to work well on the north-south table, with Rodger's Norwegians putting up a stubborn resistance and Simon's Finns causing real trouble.  A landing by VDV in the NATO rear was badly scattered and finished off piecemeal by NATO.  On the second day, another VDV brigade group landing was more concentrated and made better progress against the powerful but brittle US High-tec infantry.  Sorry, but I don't have pictures for this table.

On the west-east table, the Soviet ground forces were slow to progress, due to poor command rolls and less than favourable terrain.  Two VDV brigade groups landed, one (Alan's) entirely by parachute, attempting to secure the bridge in the NATO rear area.  The other (Andy H's) landed partly by parachute to secure the airfield abandoned by NATO and the other to secure the airfield held by Andy.

Alan's VDV landing by the bridge were badly scattered and suppressed.  Andy's RMC battalion rear left by the hills were taken out by preplanned artillery strikes.  USMC infantry in the left foreground are largely facing the wrong way - towards the lower left beaches.  Thank goodness for the US engineers in the town, supported by an M728 combat engineering vehicle, and the TOW jeeps deployed in support of the RMC by the airfield.


At the same time, two brigades of naval infantry began landing troops.  Below, Andy B's vanguard launch into the Canadian flank, although terrain slows them down nicely.


Neil and Andy's troops take on Andy H's heliborne assault.


Oooh look, helicopters.


Andy H's VDV drop on the largely abandoned airfield.


Alan's VDV attempting to reorganize.  The VDV were so scattered they suffered either distance command penalties or command penalties for trying to command troops from other commands, which meant response times were poor.


Alan also took on a naval infantry brigade, which attempted to land near the docks.  Again, a thin strip of trees, but a real obstacle to the attacker.  USMC in the power station were locked and loaded, as were another battalion dub-in on a wooded ridge just out of shot to the right.


Alan's VDV still strung out and being thinned out, especially effective were Andy T's Lynx attack helicopters.


Soviet Naval Infantry and T-55s line the edge of the wooded beach top, waiting for the order to advance.


Around the docks, the Canadian Leo 1 company, held in reserve for the front line, does a great job of threatening the seaborne beachhead flank.


Andy B's Naval Infantry are still struggling to get off the beaches.


Alan's VDV around the town, still dispersed.  The USMC field hospital (lower right) was kept busy all day treating VDV paratroopers, initially lots of breaks and spinal injuries from the drop and later GSW and flash burns from exploding BMDs, together with a handful of USMC engineers.  Both sides seemed to respect the field hospital and it survived unscathed.


Alan's beach assault.  Infantry and APCs broke through the woods near the docks and attempted to get to grips with the troops in the power station, but USMC firepower is awesome, with a Dragon ATGW team, an HMG and at least a company of infantry with SMAWs stopping them in their tracks.  On the right flank, Dragon teams and SMAWs effectively dealt with a company strength group of T-55s that advanced into the fields on the right.


An artillery strike on the power station destroyed a lot of parked Bv206s and a TOW stationed in one of the buildings behind, but the bulk of the troops survived, albeit with lots of suppressions.


The situation at the end of day 1.  The Alan's VDV had eventually broken and he decided his Naval Infantry weren't going to break through so he reembarked them.


Day 2 saw a continuation of the struggle between Neil's 82nd and Andy H's VDV, augmented by some MRR troops that had caught up.  Andy B and Andy M continued their struggle with Mark's CAST battlegroup, although the Canadians and Luxy Boys suffered at the hands of a massive timed artillery concentration.  Meanwhile, the USMC launched an amphibious assault with armour and an infantry battalion on the beaches just vacated by Andy B.  This took some pressure off the CAST battlegroup as Andy B had to turn his forces around and Andy M had to divert forces as well, otherwise their flanks were too exposed.  Sadly, this kept me busy and I didn't get chance to take more photographs.

A great weekends gaming and a big thank you to all involved.  Looking forward to next time.  Oh, and the fish and chips were excellent!