Translate

Saturday 23 July 2016

Glory Halleluiah! ACW game

We played out another scenario from "Glory Hallelujah!" at the club last week.  This time it was "Bartlett's Farm - 1863" and we used Will's (Fire at Will) most excellent 20mm ACW collection.  Ian and Will took two Reb brigades each, while I took the greatly outnumbered (but not for long) Union 1st Division.  The idea was that if anyone else wanted to join the game they could take on one of the reserve forces.

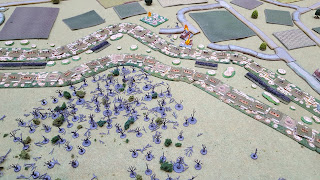
The terrain lay out, mainly using club terrain with some of Will's snake rail fencing and buildings.  Rebs come on from the right and need to cross the stream to get to grips with the Union deployed between the road and the stream.  Union reserves come on from the left at a random location determined by dice roll on the roads or through the woods.


The Reb hordes come out of the forest and push towards the stream from the top edge of the photo.  Union defenders are deployed in a thin blue line.  The line is anchored in the centre on a rifle regiment occupying a farm building just out of sight off the bottom of the photo.


A couple of southern gentlemen, Will and Ian.


Well, once we got started, it took three turns to conclude.  The Rebs attempted to rush across the stream and generally managed to fail command rolls, coming on in a piecemeal fashion.  Meanwhile, the Union rolled for each of three brigades to come on, needing 4+, and they succeeded in bringing on a brigade per turn, randomly spread across the back of the Union line.  Will's Rebs did contact the Union line, but finished up with a broken brigade and various whipped units.  The Union front line was similarly shaken but holding firm, for now.  However, behind the Union front line were three fresh brigades deployed in double lines, which the southern gentlemen didn't relish attacking, so decided to slink away into the undergrowth.


Taken from the Union left, the front line shows the pounding it has taken with lots of hit dice and shaken or disordered markers (yellow/red respectively).  The Reb right is in an even poorer state with some regiments routed or whipped and one brigade broken.  The Rebs on their left flank took too long to get through the woods, but were by the end making a nuisance of themselves shooting under cover from the edge of the trees. 


Three very similar shots, highlighting the superb figures from Will's collection, which is most excellent.


We have only played the scenario once, but it seemed to us that there was too good a chance for the Union to bring on reserves.  Three brigades with an evens chance of each coming on means only a 1 in 8 chance of not getting any reserves at all on turn 1.  With the odds in favour of a steady Union build up, if the Rebs don't get to grips with the Union line in the first couple of turns, it will all be over for them very quickly.  It was lots of fun for me as the Union player, but I suspect less so for the southern gentlemen.
 
Looking forward to the next ACW outing, having "seen the elephant".
 
Thanks for looking.

Sunday 17 July 2016

Joy of 6 2016

The Joy of 6 show took place this Sunday (17th July) at Sheffield Hallam University.  Cold War Commanders had a demo/participation game on, based on the Red Effect novels of Harvey Black.  Our game centred on a Russian/East German attack at the junction of a Dutch armoured/mechanised brigade and British 4th Armoured Division.  The right flank of 4th Armoured was held by a Chieftain regiment, the 5th Batt. Royal Inniskilling Dragoon Guards, with a detached mechanised infantry company and Milan I atgm attachments from 2nd Batt. Queens Regt.  Contact with the Dutch indicated the presence of a battalion of Leopard IIs, mechanised infantry and possibly Leopard Is.  Facing the British, it was anticipated that a Soviet tank regiment, plus a motor rifle regiment was fast approaching, while the Dutch faced a reinforced East German motor rifle regiment.

The lull before the storm.  The train rattles through a deceptively deserted German landscape.


At least the roads are quiet.


Industry appears to have shut down in the face of the Soviet advance.


Motorway fly overs, the perfect spot for Harriers to replenish.


TV emergency broadcasts advising civilians to stay in their homes, in cellars if available.  Those over 45 remember 1945 all too well.


Industrial plants deserted.


Docks frozen in the midst of containers and part loaded canal barges.


All is not deserted though.  Squadrons of Chieftain tanks advance to occupy covered positions in fields and woods.


Attack helicopter flights cross the coming battlefield.


Tanks occupy cover to act as defensive strongpoints.


Attack helicopters probe for the Soviet MLA.


Woodland provides excellent defensive cover with Chieftain squadrons covering both left and right flanks, the right covering the Dutch left flank if required.


The wiley Soviet commander uses the East Germans to try and pin the Dutch, while his tank regiment pushes into the British right flank.  Unfortunately for him, this is right in front of the woodland occupied by two Chieftain squadrons.  Suddenly, his first wave T-64 battalion is reduced to one serviceable tank, for no loss to the British.  Attack helicopters attempt to pick off parts of his second wave tank force.


Chieftains in cover are really effective.


The Soviet response is to use second wave T-64s and massed artillery to suppress the central Chieftain squadron occupying the field system.  Despite strikes from three MLRS rocket batteries and two Carnation batteries, plus tank fire, the Chieftains have only 1 to 3 hits per platoon, although all are suppressed bar the Sq HQ.  However, with all Chieftains in the woods unsuppressed and ready to fire next turn, the Soviet commander decides his force will be better served by holding back out og range.


Dutch Leopard IIs also realise the value of woodland strongpoints.


But other Dutch armoured units realise the East Germans have stalled and push across the canal to bring them under close range fire.


Dutch reserves pour on the East German agony.


And cover the docks area at the canal terminus.


The TV tower remains in NATO hands so far.


A Harrier hide located close to woodland.


The hide, secluded from most direct fire from the Soviets.


British Army logistics base, sending resupplies out to the forward tank squadrons.


Milan I teams around the power station.


The first wave of Soviet MR IFVs severely mauled by artillery and air strikes.


The day was mainly about meeting people and talking about the modelling, game system and our plans for larger games in the coming months.  Hopefully we recruited a couple of new players interested in taking part in Aegean Strike in September.  This meant that shopping was severely curtailed, although I managed to make modest purchases at Heroics and Ros, Timecast and Brigade Models, although I'd have loved more time to peruse all the other stalls present.

All the other games looked truly amazing, but I didn't really have time to look at them fully.  However, the following pictures show the "First Day of the Somme" game, using Timecast new and very excellent looking flexible trench systems.  This game was huge and was so big that they didn't have time to play, not finishing set up until lunchtime.  However, it looked superb and would make a great weekend game.


I loved the use of Woodland Scenic armatures to represent shattered and shell blown woodland.


All in all a great day out.  If 6mm is your thing, then Sheffield in mid-July is the place to be next year.

As ever, thanks for looking.

Saturday 9 July 2016

20mm Britannia WW2 German HQs

At the Gauntlet Bring and Buy, I picked up a couple of packs of Britannia infantry from Paul, another club member.

First up is the HQ group from Waffen SS pack SS22, representing the HQ of 12th SS Pz Div.  I placed the three seated figures around a map table as a vignette, presumably they are trying to work out what the Canadians will do next as they start to move off Juno beach on D+1.


The two standing figures, one with Alsation/German Shepherd, I've mounted individually.


The complete command group.


Then there was this pack of figures, an officer and two radio operators.  I think these might be from pack SS1, but there is no photo on the Britannia web site to check.


Very nice figures, I shall be ordering more of this range from Britannia very soon now.

As we're past the half way point in the year, it's probably time to reflect on progress so far.  I was very pleased to complete my 20mm Cold War British infantry, with a platoon plus of Royal Marines in berets, a company worth of infantry in helmets and enough infantry in red berets to convert regular infantry into Paras.  I also have plenty of SAS/SBS troops ready for special missions.  I've also got some opponents completed for them in the shape of a reinforced platoon of Argentine infantry who can double as cold weather NATO troops for Norway and Denmark.  I've made a start of the Winter of 79 irregular forces, although still have quite a few to complete.  All that took me from Christmas up to the big Crisis Point weekend game in April, where my British infantry, US Marines and Taliban all made it out of their boxes and on to the table.

Since April, the two world wars have been featuring heavily.  I've had a massive project ongoing which involved rebasing my Jutland fleets - Ian Shaw and I had the crazy idea of replying it on the centenary anniversary at the end of May as a club weekend game.  However, my fleets needed a revamp and we were sadly out of practice with any kind of naval gaming.  Since then, I've rebased them all and they are now on magnetic bases, safely stored in three A4 box files, and Ian and I have played out a couple of practice games on club evenings, using the fast play Jutland rules available from Tumbling Dice.  So, once we develop a suitable way to manage the arrival of the fleets, we're good to go.  Then, it seems we have decided tht next years Crisis Point game will still be set in our fictional Black Sea country o Andreivia, but we will be exploring the country's troubled past, looking at the turmoil of the aftermath of WW1 and the Russian Civil War.  I'm building an Allied intervention force, which will include British infantry in pith helmets and tin hats, ANZACs, Indian Army gunners, Cossacks, Militias in Ottoman and Russian infantry, Whippet tanks, Austin- and Garford-Putilov armoured cars and stripped down light trucks for long range patrols.  So far the ANZACs and Ottomans are done and British infantry in pith helmets and Cossacks are on the painting table.

Then I had the crazy idea of playing out some commando raid scenarios such as Operation Archery and the St Nazaire raid.  So, I picked up some British commandos from Britannia, mid-war British infantry from SHQ and Kriegsmarine infantry from Britannia.  Then a diversion when Richard Crawley suggested a Chain of Command game for Gauntlet involving WW2 German and Soviet winter troops, so I went mad investing in various plastic sets from Plastic Soldier, Pegasus and Italeri, most of which, bar some of the winter Soviets, are painted and ready to roll.  I was so impressed with Chain of Command that I'm going to play a lot more and will add a platoon of German mountain troops (handy for the Vaagso raid too) and an SS platoon in camo smocks, because I like the figures.

So, I will probably add some more M48s for my 6mm Turks, ready for the megagame of Cold War Commander at Broughton in September, as well as working on some southern European terrain for the game.  Then it will be carrying on with the WW1 and WW2 kit in 20mm.  As an aside, I also picked up a shoe box full of Baccus 6mm ACW, which will slowly add to my ACW armies.  Then of course there is the 6mm modern forces that I have been neglecting for a while such as the T-64 tank regiment I have planned for CWC, the 6mm West Germans for Team Yankee and the expansion of my 15mm Soviets for Team Yankee.

All this, of course, assumes that some other project/period doesn't muscle it's way in to my interests and divert me onto a new course.

Thanks for looking.

Thursday 7 July 2016

Gettysburg; Picketts Charge in 10mm

For the second day at Gauntlet, Will and I were debating whether to carry on with the Korsun Pocket game or try an ACW scenario from the new Glory Hallelujah! Black Powder book, which Will has recently acquired.  On hearing this, Steve mentioned he had a 10mm ACW collection with 30+ regiments per side.  This was too good an opportunity for Will to organise a refight of the Gettysburg - It can't be long now scenario.  Terrain was a simple ridge along one long table edge, lined by Union infantry and artillery, with the Rebs arrayed up to 1ft on from the opposite table edge.  For the Union, Gary took the let wing with II (part) and III corps, Jamie the centre with II corps 2nd Division and I corps 3rd Division, and Richard the right wing II corps 3rd Division and I corps 2nd Division in reserve.  Opposite them on the Rebel right was Steve with Pickett's Division and on the left was me with Pettigrew's Division with Gary and Trimble's Division behind me.

So, it's July 3rd 1863.  After 2 days of heavy fighting around the Pennsylvanian town of Gettysburg, the armies of the Union and Confederacy face off against each other, the Union occupying Cemetery Ridge and the Confederacy occupying Seminary Ridge.  Lee appears to have reached a decision and ordered Pickett, Pettigrew and Trimble to assault the Union lines.  The scenario starts with the Rebs approaching the Emmitsburg Road and about to have a very bad day.


Trimble's Division in the foreground with Pettigrew's Division beyond.


Pickett's Division nearest the camera.


The Union defence in depth on the ridge.


Looking from Cemetery Ridge towards the Emmitsburg Road.


The first turn sees Pettigrew get all 3 of his brigades moving forwards, while Trimble gets one brigade to advance, the other deciding to wait a bit to see what happens.


On the right, Pickett's men are positively jogging.  However, rather than focussing on the same point in the Union lines as Trimble and Pettigrew, they are veering off towards the Union left wing.


The view at ground level.


Pettigrew's troops with Pickett charging in the distance.


Pettigrew starts to shake his columns out into 2 regiment deep lines ready to charge home on the Union lines.


Pickett continues to advance, but not quickly enough.


Pickett is now within charging distance of the Union line.


Pickett's other brigade picks up the pace.


Pettigrew stalls momentarily.


Trimble gets a rush of blood and moves up on Pettigrew's flank.


One of Pettigrew's brigades seems to have developed a death wish.  Union commanders look on expectantly.


Lunchtime, and I had to take some photos of the excellent Team Yankee game organised by Dennis and Pete.  The crashed cars in the town centre look great.


Love the American SPG models.


Apache gunships move in on a company of T-72s.


After lunch, back to Gettysburg.  Pettigrew's Division charges the Union line.  Despite withering closing fire, they manage to wipe out 2 Union batteries and melees embroil the length of 6 regiments.


The view from the ground.


Trimble's brigades move up and the foremost brigade gets within musket range of the Union flank.


Ongoing melees sap the strength of attackers and defenders.


Confederate ranks are thinning faster than the Union at Pickett's end of the table.


Union numbers on their left flank told in  the final analysis and 2 of Pickett's Brigades broke and fled the battle.  We played out another turn at Pettigrew's and Trimble's end of the table as there were a number of ongoing melees, which were often going the Reb way, although fresh reserves were being fed along the line, so it was only a matter of time.  Trimble's Division was able to retire largely unharmed, while Pettigrew's Division was badly mauled and Pickett was down to one effective brigade.  I think this is one of those scenarios where the Rebs can only win by not turning up.  The High Water Mark of the Confederacy was a little further north of the actual historical spot, but about the same distance in, which suggested an honourable draw, albeit a very bloody one for the Rebs.

Thanks to Steve for providing the troops and terrain and for Will for organising the scenario with very little lead time.  Thanks also to Gary, Jamie, Richard C, Steve and Gary for providing a fun game with the right level of commitment to the scenario tasks, the history of the period and, above all, having fun with toy soldier.

Thanks for looking.