Translate

Showing posts with label ww1. Show all posts

Thursday, 3 August 2023

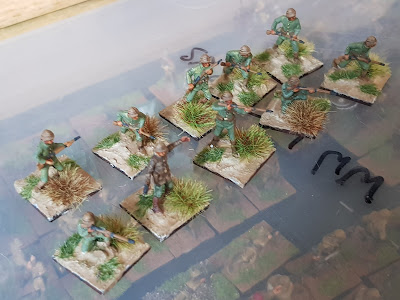
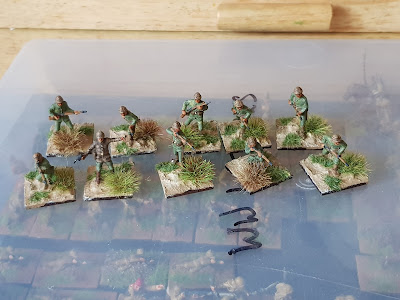
20mm WW1 Turks in green

 Will offered to share the excess WW1 Ottoman Turks from his ebay win, so I took up his offer.  These are Hat figures painted up in green, using a recipe from Mark Hargreaves book.


I am quite pleased with the faded look and will probably have at least enough to do another 3 or 4 similar groups, although I'm tempted to try some of the other recipes in the book.

Nearly finished the 28mm DAK infantry and then on to their vehicles and some support weapons.

Thanks for looking.

Thursday, 6 July 2023

Some 20mm WW1 and RCW progress

Trying to sort out some of the projects that have stalled and make some progress, I dug out various bits and pieces to complete.

First up, a bargain bits box miscast from Early War Miniatures at one of the shows.  It's a Mk 9 troop carrier - plenty of space on top to add some stowage at some point.


Also from EWM, this mounted Hotchkiss LMG team with crew in Solar helmets for the Middle East.


And the dismounted LMG team.


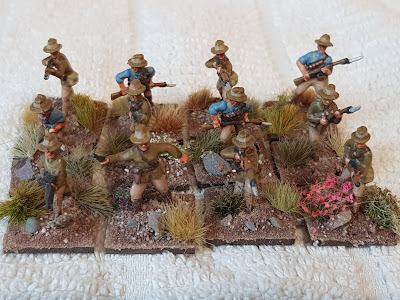
And finally, some Strelets dismounted Australian cavalry ready to do service as dismounted Camel Corps troopers.


I've got a couple of bags of assorted Turkish WW1 infantry in kolpaks and arab headress, an ebay win split with Will, with some Turks in green uniforms next off the table.

Thanks for looking. 


Friday, 22 October 2021

Setting the East Ablaze Dunsterforce game

Will, Ian, Andrew and I played out a game of Setting the East Ablaze at the club last night.  We opted for scenario 1 from the Adventures of Dunsterforce Supplement, with the British sending an Indian Army force northwards through Persia in an attempt to head off an Ottoman army heading for Baku and its' oilfields.  A large game, 8 units of Cossack infantry, 2 of Cossack cavalry and a unit of British Hussars, supported by HMGs and mountain guns and a Martinsyde ground attack aircraft, taking on 12 large units of Jungali irregulars, supported by HMGs.  Dunsterforce entered on the road to the left of the photo below and had to skirt or go over the ridge in the foreground, to reach the bridge and cut off the Jungali retreat/reserves.  Troops and terrain are all from Will's collection.


Detail of the river and crossing (totally unlike the real bridge) with chopped up matting representing scrub along the river banks and at the foot of the stone scattered ridge.


The Jungalis or Junglies as British troops referred to them, dug into shallow trenches and rifle pits on the banks of the river and took to ground in the scrubby areas and amongst the rocks on the ridge (hidden from British airpower).


Said British air power, here a Spowith Camel, representing a flight of 2 Martinsyde aircraft.


View from the Martinsyde at the end of turn 1.  The combined Cossacks and tiny British contingent are advancing either side of the road, mounted Cossacks and British armoured cars advancing around the Tea House near the curve in the road.  Cossack infantry form a densely bunched mass attempting to push up onto the ridge.  The Jungalis have triggered their ambushes, with one spectacularly successful ambush routing a Cossack infantry unit (dead are piled on the hilltop lower left).  Jungali reserves pile over the bridge (lower right) to form a conveyor belt feeding fresh natives onto the ridge to hold off the Cossacks.


Jungalis facing the stiff upper lip of dismounted Hussars, bolstered by a Lewis LMG.


The Cossacks still bunched up.  The two chaps in front of their main body are routing.


After a second round of play, another Cossack infantry unit has broken on the run up the hill.  However, Jungali ranks on the hill top have been spread thin, but help is on the way as reserves are fed forwards.


A big Jungali highpoint was almost wiping out the British Hussars, although they managed to pass all but one morale test, leaving them pinned.  The British armoured cars were determined to wipe out the Jungali HMG team at the end of the ridge.


Cossack mountain artillery pounded the Jungalis on the ridge nearest the camera, thinning them out considerably, but they were holding on for now.


This was a very large scenario and we were very ambitious trying it out in an evening.  However, it did let us practice using a variety of troop types, as well as artillery, airplanes and armoured cars.  The scenario looks to be a tough nut to crack for the British/Cossack forces and the Jungalis were holding their own at the end having done for 2 units of Cossack infantry and the British Hussars.  Still some questions to iron out in the rules and need to get more familiar with the rules, but lots of potential and a fun and attractive looking game.


Thanks for looking.
Monday, 20 July 2020

20mm WW1 dismounted Australian cavalry

I wanted some dismounts for my troop of WW1 Australian Light Horse, so went with the Strelets dismounted Australian Camel Corps figures with a suitable paint job.


The officer figure.


Lewis gunner - not sure if he'd hit anything firing from the hip.


While I was at it, I did a three man Vickers MMG team to provide them with some support.


The command/spotter team is from the mounted Australian Camel Corps Strelets set, with a reclining officer looking through a telescope and a heliograph signaller.


And for support for my British in sun helmets, I head swapped another of the Australian Vickers teams with heads taken from the dismounted Imperial Camel Corps Strelets set.


These came out OK and provide me with the dismounts I need for my HAT figures, as well as some support for the Australian cavalry.

As ever, thanks for looking.

Saturday, 27 June 2020

20mm WW1 Middle East British Camel Corps and dismounted cavalry (lockdown 18)

I wanted some dismounted British cavalry for WW1 in the Middle East, so out came the dismounted Imperial Camel Corps from Strelets.  While I was looking at them, their mounted mates managed to get some elbow room on the painting table.  Again, I followed the guidance in Mark Hargreaves book, modified for the smaller scale and my painting abilities.

First up is the mounted set, painted in khaki drill.  Shame the camels are generic, mainly Arab-style, rather than regulation British equipped and with next to no baggage.  Nice set, showing troops in relaxed walking or standing poses, without anyone appearing to be firing their weapon, just as it should be for troops used rather like mounted yeomanry.


The mounted commander.


Then these are nine dismounted troopers to represent dismounts for the Camel Corps.  These are painted in khaki drill to match the mounted chaps.  The guy at the back is a camel holder from the mounted set.


Then we have a unit of twelve dismounts in khaki serge.


And finally for now, a unit of twelve dismounted cavalrymen in khaki drill - suitable for dismounts for the lancers posted earlier.


These newer style Strelets figures are really nice compared to their earlier chunky style.  The animation of the skirmish poses, especially the prone figures and some of those advancing or running, is really quite pleasing.  One or two of the helmets appear to have part of the rim missing, which seems to be a casting flaw, but generally they were clean and relatively easy to paint.  I'm really impressed that they are starting to fill some of those larger gaps in the WW1 ranges, especially for the Middle East.  They also fan my interest in some of the what-if's around Allied intervention in Russia and the Soviet Union in the last year of the war and the immediate post-war period.  Now, how cool would WW1 Greek infantry be to game an Allied intervention force in Turkey?

As ever, thanks for looking.