Translate

Friday 30 March 2018

20mm Late WW2 German medics

This is the SS stretcher bearer party by CPM at CP Models.  The figure carrying the wounded soldier on his shoulders will make a nice medic figure for Battlegroup games, while the stretcher party will form, well, a stretcher party for Battlegroup.


The medic carries a soldier who has lost his right leg and has the stump hastily bandaged and tourniqed.  The figure on the stretcher is an officer with his cap and belt placed on the blanket covering.  The officers face is suitable contorted with mouth open in pain.


Nice figures, these will find their way into my 9th SS Panzer "Hohenstauffen" battlegroup for our upcoming Market Garden gaming weekend in May.

Thanks for looking.

Sunday 25 March 2018

15mm Marder III Sdkfz139

I picked up some Battlefront vehicles in a sale recently.  The first one out of the bag was this Marder III Sdkfz139, which I've painted in Middlestone with irregular blebs of orange-brown with a little Mahogany to darken it.  The two crew are in neutral grey trousers, which I've mixed with field grey in an attempt to create variations on reed green.


Despite the high profile and poor armour, making it quite vulnerable, the Russian 76.2mm field gun, redesignated 7.62cm PAK36(r) by the Germans and rechambered slightly to load standard 75mm ammunition, means it packs a real punch.


The model was straightforward to build, the usual resin hull, white metal tracks, gun and crew, plus the gun support and hull mounted MG34.


Nice "publicity" shot to boost morale by emphasising the length and calibre of the gun.


Should be useful for mid-WW2 on the Eastern Front and in limited numbers in Tunisia.

Thanks for looking.

Friday 9 March 2018

Battlegroup Market Garden test game

Will and I tried out a test game of Battlegroup Market Garden at the club last night.  We chose up to 500 points following the battlegroup selection restrictions from the book.  Will had exactly 500 points of US paratroopers, which included a parachute infantry platoon with 57mm AT gun, a battery of 2 75mm pack howitzers, three recce jeeps with dismountable MMGs and a battery of off board 81mm mortars.  I went with an armoured recce infantry platoon from the Wacht am Rheine book with 75mm PAK, MG34 tripod and Panzerfaust supports, Sdkfz 250/9 recce, 2 Stug IIIGs and a resupply lorry.  We played the flank attack scenario.


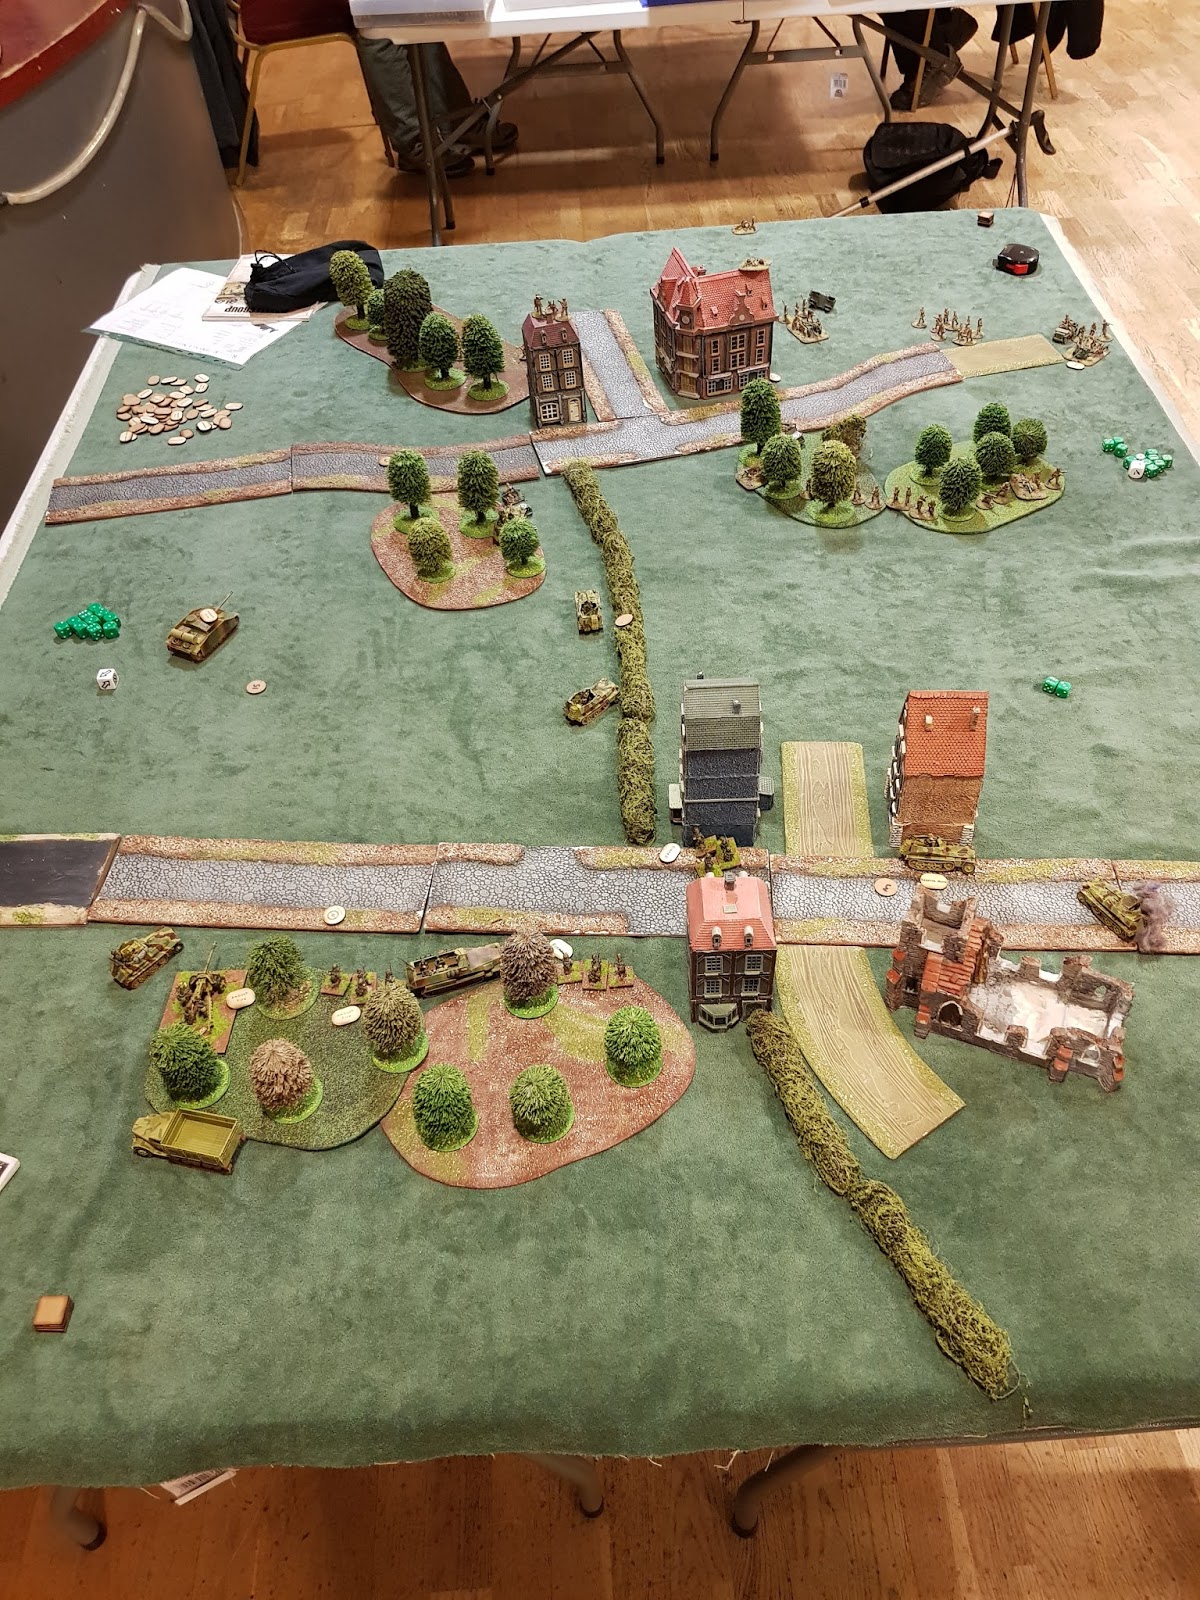
This is the table layout, based on one from the Rapid-Fire Arnhem supplement.  The US deployed their recce top left and main force top right.  My German recce lower right and main force lower left.  We rolled 1 for weather, so thunder storms grounded all air support.  5 objectives were placed, one in the centre (on the hedge) one in the village on the German right and one in the open field on the German left.  There were two more in the woods on the right at the US end of the table and in the woods on the left at the US end.  The Germans were outscouted, so took a chit before we began.

Placement saw me, the Germans, with a Stug IIIG on my left plus the PAK 40 and platoon command 250/1, and the recce 250/9 on the road to the right of the village in the foreground.  Will brought on 3 recce jeeps on the German left and several units including his Pack howitzers and 57mm AT gun on the right, as well as some squads of infantry.  With the addition of his recce units, he won the dice-off and took first move.  He secured both objectives at his end of the table with recce jeeps and pushed his main force on table, although they remained bunched up (rear right below).  Cheekily, his 57mm moved a full move on table, up to the road and unlimbered, then took two shots at my poor defenceless 250/9, brewing it up.  So, by the end of the 1st US turn, I'd taken 1 chip for out scouted, 2 for objectives and one for the 250/9.  In my turn, I pushed a Stug IIIG forward to secure the objective in the field on my left.  The CO called in an 80mm mortar strike on the bunched up paratroopers on the right, killing a jeep tow for the howitzers, and unlimbered the PAK 40 on the edge of the woods on my left, so managed to make the paratroopers take 2 chits, one for loss of jeep and one for objective secured.

Turn 2 saw Will move some reserves on and moved his troops into position where he could do some spotting.  He dismounted his recce MMGs and moved the jeeps out of sight.  My turn saw me bring on the FHQ, and a 250/1 with MG34 team aboard from reserve.  The 250 trundled along the road into the village, sheltering behind a building and securing the objective, forcing another chit on Will.  My PAK and Stug went on ambush fire and the FHQ moved up to the edge of the woods, ready to take up a more covered position next turn (I hoped).  The platoon command called in more mortars, to little effect.

Turn 3 was very unkind, with Will plastering my troops with 75mm howitzer and 81mm mortar barrages, placing a pin on the FHQ, which was a blow.  In my turn I brought on a solitary 250/1 with MMG team from reserve.  The platoon CO called in fire which drifted wildly, straight on to the AT gun, causing some pins.  The 250/1 from reserve slipped around the back of the woods and debussed the MG team into the woods.  I also brought on a 250/10 and pushed that down the left flank (out of shot).  I didn't unpin the FHQ as I wanted to keep the chits until I really needed them.

Situation end of turn 3.


My troops trying to secure a firebase in the trees.


What had my 250/9 done to deserve this kind of treatment?


Those pesky Americans, overpaid, oversexed and now over here in Holland too.  Some pinned units around the AT gun in the foreground.


Next turn the US moved their infantry forward into the woods on my right and took some long range shots at one of my dismounted MG34 teams in the woods.  More artillery barrages rained down on the woods to the rear.  I had received a taste of what the US artillery could rain down, and didn't much care for it.  In the true German spirit of counterattack, I decided to use the armoured vehicles to get to grips with the paratroopers and pushed them forwards on the left, partly to free-up the Stug and partly to try and clear out the MMG in the wood.  Long range fire from the MG34 teams in the woods was enough to deal with the recce MMG in the woods.  Two 250/1s moved up to the hedge line to at least contest the objective in the hedgerow, with the recce jeep behind the woods pinned by their area fire.  The 250/10 barged into the woods coming up to close range of the pinned recce jeep.  In the town, my 250/1 debussed and the MG34 team entered the grey building.


The paratroopers continued to call down all kinds of unpleasantness on my troops in the rear, causing lots of pins.  They also brought troops into the woods on my left at the back and right of centre.  This latter group pinned my MG34 team in the grey building.  I brought on the rest of my force, including the second Stug, an HMG team and my logistics truck.  The latter raced into cover in the village, while the second Stug moved up beside the first followed by the tripod MG34 team.  My mortars caused a pin on the recce MMG team in the woods on my right.


At the end of my turn, I removed some pin markers, taking one chit.


This was the crucial part of the game, so photo taking took a back seat.  The Stugs advanced, being very careful to stay out of sight of the 57mm which had a fire lane along the road.  They then used their pintle MGs to shoot up the US paratroopers in the woods (on the rear left in the photo below).  The 250/10 in the woods missed the jeep, which bugged out, and then added firepower to shooting up the infantry.  One of the 250/1s at the hedgeline shot at the US in the woods on the right, causing some pins, while the other went on ambush fire - Will was trying to sneak a bazooks team into the building at the edge of the village.


On the right, I used a reserve move to push a 250/1 forward to shoot up the woods.  I thought I had carefully placed him out of sight of the 57mm AT gun, but alas no, he suffered the same fate as the 250/9 at the start of the game.  By now, my battle rating counters were getting worrying.


However, all that Stug firepower began to take effect, wiping out one of the squads in the woods on the left and the bazooka team, pinned with ambush area fire and then taken out with aimed fire.  The 250/1s by the hedge started to take area and aimed fire at the paras in the woods on the right.  My MG teams in the woods to my rear sidled sideways and took up positions in some of the buildings, while the team in the grey building exchanged fire with the paratroopers in the right woods.  US casualties are mounting (cluster of dead on the right table edge).


Will shifted his artillery fire to the 250/1s by the hedge, but with limited success.  He also broke the MG team in the grey building.  Return fire from the 250/1s by the hedge and MG team in the red roofed building took out a squad in the woods to the right.  Over on the left, the Stugs were whittling away the command team in the left woods.  Chits were getting critical for both sides now.


Payback from the Stugs, supported by a 250/1 and 250/10 and a debussed MG34 team.  Things were now looking much better for the Germans, lots of firepower available.


The spotter in the house continued to call in artillery and mortars, but with less effect on the more dispersed Germans.


The German rear.  A major blow was the loss of the platoon command 250/1, plus the loss of 2 commanders and a stretcher bearer, losses which had contributed to the critical BP total for the Germans.


The game ended with the next German activation, when the Stugs eliminated the command team on the left and turned their guns on the spotter team in the house on the edge of the woods.  The next chit taken broke the US force by 2 points.  My Germans were 3 points away from breaking.

This was a really close fought battle, with no quarter offered from either side.  With their abundant recce, the Americans had it all their way in the first few turns, outscouting me, securing 2 objectives, destroying my recce and starting to rain mortars and howitzers onto me.  My initial plan to secure a fire base and then close with my armour turned out to need changing badly, thanks to the US artillery.  Once my troops started to disperse and move on the paratroopers on the left, things got easier as the effect of the artillery reduced and the massive firepower of the Stugs and 250/1s came into effect.  Wills 57mm gun was effectively isolated, despite good lanes of fire, because the Stugs didn't need to cross these fire lanes to shoot up the paratroopers.

This was a really intense, but fun game.  Lots of action, with some really interesting twists and turns.  At one point I thought the US were going to wipe the floor with me, but a bit of luck and some serious firepower saved the day.  The recce platoon is an interesting force and makes for some interesting gameplay.  How they might fare against Shermans from Guards Armoured is a different matter all together.

Thanks for looking.

Thursday 8 March 2018

Battlegroup Kursk game

This is a Battlegroup Kursk game with Soviet infantry and T-34s taking on a mixed bag of panzergrenadiers, Stugs and Panzer IVs.  The Russians are from Will's collection and the Germans are Steve Hann's.


Quite a simple table with some low hills, woods and a small town/village at the German end of the table.  If I remember correctly (this was played in January) the Germans had 500 points including defences, while the Soviets had 600 or maybe 700 points.


The German infantry dug in on the edge of the village, while the armour lurked menacingly behind the cover of the buildings in the village.  The Soviet infantry fanned out and advanced on a broad front, while their tanks decided to advance on the German left flank, shielding themselves from German fire with a low hill and woods.  Being wise to this, the Germans bided their time and waited putting their vehicles on ambush fire or reserve move.


Once the Russian tanks got within range of the Stugs and Pz IVs, there was a flurry of long range gunnery, with the Germans obscured and the Soviets largely in the open.  This was only going one way.  The Stugs, with their limited ammo loadout, needed frequent resupply - fortunately there was a truck standing by.  He led a charmed life, avoiding any serious pinning issues from the Russian mortars.


In revenge, the Soviets shot up the front line defenders, raining down mortars, which whittled away the defenders.and KO'd the observers Kubelwagen.


The Soviets had lost almost all their mobile armour by the end of the game, although their infantry was largely untested.  The Germans had lost significant amounts of infantry and had some bad luck in chit scores.  When we called the game, the Germans were close to their BP, while the Soviets were only c. half way to their BP, so we agreed a Soviet victory, although the Germans grumbled about the devastation inflicted on the Soviet armour.


Another fun game.  Thanks for looking.


Sunday 4 March 2018

Unofficial Battlegroup modern 6mm game

Last Thursday's game saw Ian and I play out a game of Richard C's unofficial Battlegroup Modern rules.  We decided to go for a 6mm scale and play a larger, attack-defence game.  The British took 840 points and the Soviets took 1100 or thereabouts.  I was surprised by Ian's choice of Battlegroup as he opted for a T-72 company supported by a platoon of infantry in BMPs and a Shilka.  My British comprised a mechanised platoon, dug in in trenches, supported by a Chieftain Mk11 troop, 2 dug in Milan firing posts,a Swingfire ATGM, Blowpipe team in Landrover, artillery spotter team in Landrover and, crucially as it turned out, 2 tubes of 81mm mortar support and two tubes of 155mm artillery support with one salvo of FASCAM.

This was the battlefield, laid out with a small village in the distance on the NATO right, and another in the foreground on NATOs left, within their defensive perimeter.  I deployed the Chieftains foreward, behind the small hill right of centre.  The infantry and a Milan teams were dug in on the edge of the village on the left and woods on the right of the pond.  A small reserve was also dug in around the farm complex on the right and woods in the immediate central foreground, with a Milan team dug in on the hill.

Neither of us brought recce, so neither was outscouted.  Soviets had the first move as they were attacking.  The Brits rolled 5 for their units on ambush, so 3 units, the 2 Milan teams and the FV438 Swingfire went on ambush.


Ian used his battle drill to advance his T-72 company, less one platoon, cross-country down the British left flank at top speed.  The last T-72 platoon advanced slightly right of the main company, while the BMP platoon lurked behind the hill in the far distance on the centre of the table.  The dismounted spotter for the FV438 spotted one of the T-72 platoon tanks in the centre and brewed it up.

In the British turn, the artillery observer called in a FASCAM strike on the area between the two woods on the British left and the small hill, rolling normal accuracy and a deviation of 7 inches, landing right on top of the bunched up T-72s and the FHQ, also in a T-72.  Mortars hit the hill top in front of the BMP platoon, causing some pins.  The Chieftain troop took up hull down positions on the hill on the right and shot up the lone T-72 platoon, pinning another tank.


The centre of the FASCAM area marked by the spotter chit in the foreground.  This was effectively game over for Ian's Soviets.


With the rest of the British orders in Turn 1, several infantry units on the British left went on ambush fire.


And on the right.


Ian then discovered that with d6+2 attacks from the FASCAM on top armour, any attempt to move resulted in a brew up.  Ian decided that the surviving tanks were effectively neutralised until some mine clearance vehicles could be call forward.


Ian gamely pushed his T-72 from the detached platoon, forward, only to make a great target for a Milan team, which promptly despatched it.


His BMPs did manage to immobilise the troop commanders Chieftain with a salvo of SA-4 ATGMs (top left in photo below).


The situation near the end, with the BMPs in the far distance battered by 81mm mortar and 155mm artillery fire.


Ian did draw a helicopter chit and brought on a Hind E, catching my Blowpipe team unaware and not on ambush fire.  The Hind took out another Chieftain with ATGM fire, but was then hit by a Milan ATGM on ambush fire.  We were unsure how to resolve the attack, but it appeared the Milan team blew it out of the sky.

At this stage, snow was still coming down steadily, so we called an end to the game, even though the Soviets still had spare BPs, while the British had taken 3 points of damage.

Reflections on the game:
Ian's tactics of bunching up his T-72s and concentrating firepower turned out to be the wrong thing to do in the face of FASCAM.  With some lucky drift, the Brits plopped it down right on top of the whole company stopping it in its' tracks, literally dead if they tried to move.

We wondered if FASCAM was a little too powerful with d6+2 vs top armour.  We thought maybe d6+2 for the first turn after deployment and/or first turn entering the minefield, maybe falling to d3+2 or even d3 for further turns.  I'm not convinced, but it was a game changer for Ian.

Thanks for looking.

Friday 2 March 2018

Setting the East Ablaze

A couple of weeks back, Will and I tried out Setting the East Ablaze.  I picked up a copy at Vapnartak at the start of the month, so we gave it a go.  I'd only managed a brief read through before playing, so we were fumbling around a lot trying to work out some of the mechanics.  However, it was a fun game and I really like the period - not just the historical options, such as Reds vs Whites, Reds vs Ukrainians, Reds vs Central Asian kingdoms, Russo-Polish, Russo-Finnish, Czech Legion, Greece-Turkey, etc, but the what ifs, such as Allied intervention in the RCW, Turkey, Red invasion of India, Red invasion of Germany - all interesting settings.

Because we were learning the rule set, I don't really have a coherent after action report, but the table looked great.  We played a meeting engagement between Will's plucky Reds and my stalwart Whites, the photo below showing the situation at the end of turn 1 from the White end of the table.


The Whites were as keen as mustard on the left flank, but more reluctant on the right, but not so my newly painted unit of Strelets WW1 Russian Hussars, who merrily cantered along the road, despite the proximity of all those Red Cavalry in the Budinovkas.


The Red Cavalry were getting too close to the White Hussars for comfort.


But being death or glory boys, they took the Reds head on in a charge.


A rather self-immolating charge.


The Whites on the left reached the village at the same time as the Red infantry.


A furious exchange of ineffective shooting, slowly whittling away both Red and White, but then the Reds had more infantry to hand.


The costly melee goes on, with the Hussars taking serious losses, albeit inflicting damaging losses on the Reds, but then they have two more units nearby.


A fun game.  I think I was out manoeuvred in the early stages and never really caught up.  Still lots to discover about the rules,. but quite a nice effect caused by the randomness of card activations.

Cheers, Andy