In preparation for a new project for a Turkish army for the 80's and 90's, here are three M113 apcs (H&R USM11) that I had spare in my bits box that I've painted up in a NATO three colour scheme, using NATO green and black. However, rather than NATO brown for the earth colour, I went with German orange ochre, as most pictures I could find on the web suggest Turkish camouflage patterns use a more orange colour, presumably reflecting earth colours locally.
Feel free to let me know if I'm on the right track, or not, with the colours. For variety, I'm thinking of adding a yellow sand colour to the three colour scheme as well, representing the sort of camouflage pattern used by the Turks for deployment against Kurds, Iraq and Syria in the southeast of the country.
Thanks for looking.
Translate
Monday, 28 April 2014
More 1980s French in 6mm
Back to my 6mm gear over the weekend.
First up are a maintenance stand and medical evac stand for the big game at Broughton. The maintenance stand comprises a VAB Genie and an AMX-30B recovery vehicle, both by Scotia (FM33 and 43 respectively). The medevac stand comprises two VABs, I think by Heroics and Ros (FM05), painted with Red Cross markings. The engineer vehicles need a little more detailing to finish them off, mainly the yellow dot NATO weight markings that I've put on the rest of my vehicles.
The medevac stand in more detail. I'm assuming these vehicles are carrying wounded to a suitable temporary helipad for aerial evacuation.
Next up are various helicopter assets. First up a Heroics and Ros Alouette III attack helicopter (FMA401). For variety, I've painted these in the three colour camouflage scheme that seems to have come in to widespread use at the end of the 80's, but I'm stretching the scheme a little forward to 1985.
This is the Gazelle attack helicopter (H&R UKMA401). The model is unarmed, but represents a TOW armed aircraft, so I may try and scratch build some tubes either side of the fuselage to represent the TOW launchers.
The Puma transport helicopter (H&R UKMA403).
All the helos need French roundels and an "armee de terre" added to the fuselage, although I suspect these would be painted over in wartime.
I've ordered a few more French models from Heroics and Ros and Scotia to complete some light armoured battalions equipped with AMX-10RC and ERC-90 Sagaie, which will allow me to field the Daguet Brigade from the 1st Gulf War in 1991, although these forces are destined to appear in another theatre altogether!
Thanks for looking!
First up are a maintenance stand and medical evac stand for the big game at Broughton. The maintenance stand comprises a VAB Genie and an AMX-30B recovery vehicle, both by Scotia (FM33 and 43 respectively). The medevac stand comprises two VABs, I think by Heroics and Ros (FM05), painted with Red Cross markings. The engineer vehicles need a little more detailing to finish them off, mainly the yellow dot NATO weight markings that I've put on the rest of my vehicles.
The medevac stand in more detail. I'm assuming these vehicles are carrying wounded to a suitable temporary helipad for aerial evacuation.
Next up are various helicopter assets. First up a Heroics and Ros Alouette III attack helicopter (FMA401). For variety, I've painted these in the three colour camouflage scheme that seems to have come in to widespread use at the end of the 80's, but I'm stretching the scheme a little forward to 1985.
This is the Gazelle attack helicopter (H&R UKMA401). The model is unarmed, but represents a TOW armed aircraft, so I may try and scratch build some tubes either side of the fuselage to represent the TOW launchers.
The Puma transport helicopter (H&R UKMA403).
All the helos need French roundels and an "armee de terre" added to the fuselage, although I suspect these would be painted over in wartime.
I've ordered a few more French models from Heroics and Ros and Scotia to complete some light armoured battalions equipped with AMX-10RC and ERC-90 Sagaie, which will allow me to field the Daguet Brigade from the 1st Gulf War in 1991, although these forces are destined to appear in another theatre altogether!
Thanks for looking!
Wednesday, 23 April 2014
DAK in 15mm
Here is my 15mm force for Flames of War or Blitzkrieg Commander. It represents a Grenadier Company with various supports. Front row (L-R) are 1st, 2nd and 3rd Grenadier platoons, plus a command group with CinC and 2inC and four AT rifle stands. Middle row (L-R) MG platoon, Mortar platoon, 50mm PAK38 AT gun platoon and PzIII tank platoon. Rear row (L-R) recce platoon of two Sdkfz 222 and one 223, Sdkfz251/B platoon and Afrika Schwere Pz platoon of two Pz III and two Pz V ("big cats"!).
The whole battlegroup.
The panzers, all by Plastic Soldier Company.
Command, CinC and 2inC plus AT rifle stands. Infantry figures are a mixture of Peterpig and Skytrex 2014.
1st Grenadier platoon
2nd Grenadier platoon
3rd Grenadier platoon
MG platoon with one spare MG stand
Mortar platoon with commander and observer
PAK 38 platoon from Battlefront, actually a Gebirgsjaeger platoon painted as DAK
Zvezda Sdkfz251/B platoon to convert a Grenadier platoon into Panzergrenadiers
Recce platoon, Sdkfz 222 from Zvezda and a 223 by Battlefront.
The whole battlegroup.
The panzers, all by Plastic Soldier Company.
Command, CinC and 2inC plus AT rifle stands. Infantry figures are a mixture of Peterpig and Skytrex 2014.
1st Grenadier platoon
2nd Grenadier platoon
3rd Grenadier platoon
MG platoon with one spare MG stand
Mortar platoon with commander and observer
PAK 38 platoon from Battlefront, actually a Gebirgsjaeger platoon painted as DAK
Zvezda Sdkfz251/B platoon to convert a Grenadier platoon into Panzergrenadiers
Recce platoon, Sdkfz 222 from Zvezda and a 223 by Battlefront.
To wrap up the unit I have two Battlefront Sdkfz 10/5 2cm AA vehicles assembled that need painting up and the unit is complete. I just need to add some rocks and static grass to the stands for a bit of variety and the unit is complete. They will then be ready for a mid-war Africa FoW campaign at the club starting next week.
Thanks for looking.
Tuesday, 22 April 2014
Saga tournament
Last Thursday was the last club night before Easter and an enforced break due to electrical rewiring due to take place this week. Rick had organised a Saga tournament, so 8 of us took part, each of us playing three games during the course of the evening. My Anglo-Danes Christmas present is still in the original wrappings, so Luke very kindly lent me his.
As luck would have it, Luke was my first opponent, so his Irish warband faced his own Anglo-Danes under my control. We played the escort scenario with my ADs trying to cross the board with three carts. The ADs advanced rapidly to get to grips with the Irish, with the carts following up closely. In the ensuing fighting, fortunes swung both ways, with the ADs killing the Irish warlord early on, only to lose their own soon after. In a series of skirmishes, the ADs were whittled down to just one unit of three warriors, although the Irish also suffered. Fortunately, my carts were able to make a sprint for the board edge in the last turn getting two safe and one almost at the board edge for a win, albeit at great cost in manpower.
Next up was Pete with his Jomsvikings and a clash of warlords scenario. I tried to screen his warriors with a unit of AD warriors while my warlord with two units of hearthguard and another warrior unit went after Pete's warlord. Unfortunately, my poor dice throwing led to some losses among the hearthguard, although overall losses were pretty even. When time ran out, the figure tally was similar, but I had lost one more hearthguard than Pete who lost one more warrior, leaving Pete the winner by a single point. Boo, hiss. Still, I'd learned to isolate the enemy warlord with retainers, before moving in with my own warlord to deliver the death blow.
My warriors screening the right flank in front of the building. On the left, two units of hearthguard and a unit of warriors with the warlord confront the Jomsviking warlord.
The third game was against Ian's Vikings. Again the scenario was clash or warlords. On deployment, I spotted that Ian had placed his warlord in the angle of a hedge line with his retainers strung out along the hedges, hoping to benefit from better saves when being attacked across the hedge. As I tried against Pete, I screened the left flank with a unit of warriors and went hell for leather at the Viking warlord with two units of hearthguard and the warlord with a unit of warriors. The first turn of combat whittled down the hearthguards on either side of the Viking warlord with my hearthguard generally coming off worse. In the next round of fighting, my warlord and warriors again attacked the Viking warlord, this time using the Lords of Battle to enhance the number of attack dice. Results paid off with too many casualties for the Viking warlord to shrug off and he went down amidst a series of spear thrusts and sword thrusts.
The final scene with the Viking warlord lying dead in the angle of the hedge.
I was so chuffed with myself I had to take a close up!
All in all a great night. Saga is a fun game and everyone seemed to enjoy themselves. A big thank you to Rick for the organisation and to Luke for the loan of his Anglo-Danes. Also a big thanks to Luke, Pete and Ian for providing such fun opponents, especially Luke who kept smiling even when his own Anglo-Danes got the upper hand, despite being nearly slaughtered to a man.
A link to Rick's tournament page with loads of pics and a nice summary.
http://rgmb-stonebridge.blogspot.co.uk/2014/04/a-saga-tournament.html
Thanks for looking
As luck would have it, Luke was my first opponent, so his Irish warband faced his own Anglo-Danes under my control. We played the escort scenario with my ADs trying to cross the board with three carts. The ADs advanced rapidly to get to grips with the Irish, with the carts following up closely. In the ensuing fighting, fortunes swung both ways, with the ADs killing the Irish warlord early on, only to lose their own soon after. In a series of skirmishes, the ADs were whittled down to just one unit of three warriors, although the Irish also suffered. Fortunately, my carts were able to make a sprint for the board edge in the last turn getting two safe and one almost at the board edge for a win, albeit at great cost in manpower.
Next up was Pete with his Jomsvikings and a clash of warlords scenario. I tried to screen his warriors with a unit of AD warriors while my warlord with two units of hearthguard and another warrior unit went after Pete's warlord. Unfortunately, my poor dice throwing led to some losses among the hearthguard, although overall losses were pretty even. When time ran out, the figure tally was similar, but I had lost one more hearthguard than Pete who lost one more warrior, leaving Pete the winner by a single point. Boo, hiss. Still, I'd learned to isolate the enemy warlord with retainers, before moving in with my own warlord to deliver the death blow.
My warriors screening the right flank in front of the building. On the left, two units of hearthguard and a unit of warriors with the warlord confront the Jomsviking warlord.
The third game was against Ian's Vikings. Again the scenario was clash or warlords. On deployment, I spotted that Ian had placed his warlord in the angle of a hedge line with his retainers strung out along the hedges, hoping to benefit from better saves when being attacked across the hedge. As I tried against Pete, I screened the left flank with a unit of warriors and went hell for leather at the Viking warlord with two units of hearthguard and the warlord with a unit of warriors. The first turn of combat whittled down the hearthguards on either side of the Viking warlord with my hearthguard generally coming off worse. In the next round of fighting, my warlord and warriors again attacked the Viking warlord, this time using the Lords of Battle to enhance the number of attack dice. Results paid off with too many casualties for the Viking warlord to shrug off and he went down amidst a series of spear thrusts and sword thrusts.
The final scene with the Viking warlord lying dead in the angle of the hedge.
I was so chuffed with myself I had to take a close up!
All in all a great night. Saga is a fun game and everyone seemed to enjoy themselves. A big thank you to Rick for the organisation and to Luke for the loan of his Anglo-Danes. Also a big thanks to Luke, Pete and Ian for providing such fun opponents, especially Luke who kept smiling even when his own Anglo-Danes got the upper hand, despite being nearly slaughtered to a man.
A link to Rick's tournament page with loads of pics and a nice summary.
http://rgmb-stonebridge.blogspot.co.uk/2014/04/a-saga-tournament.html
Thanks for looking
Sunday, 6 April 2014
An even bigger Flames of War game
It was a gaming weekend at the Defenders club in Broughton a couple of weeks ago. This gave the opportunity for a large Flames of War game to be organised with 10 players, 5 Soviets and allied Romanians taking on 5 Germans. An interesting confrontation then between Romanian Panzer IVs and German Panzer IVs. I found myself on the right flank of the German line next to Adam, Ben, Dave and Ian with Phil and his Jagdtigers as overall commander and fire brigade. Opposite were Luke, Pete, Martin, James and another Ian (I think). Germans each had 2000 points and the Russians I think had 3000 points.
Views of the battlefield looking towards the Soviet table edge, moving along the table from German left to right. The left flank, scene of some hot PzIV on PzIV action.
Centre of the table.
Ruined factory
German right flank with blitzed town
Looking along the table from the German right, Germans on left, Soviets on right.
The opposite end of the table.
The situation at lunchtime. Three turns in and the Romanians and Germans were having at it with relish on the German left, but Luke's cunning plan for the Soviets was to refuse the German right and make a concerted push on the German left and centre. This meant my Grenadier company was able to occupy the ruined town with ease and set up a PAK front with 88s and Adams PAK40s. Unfortunately, we had little to shoot at.
Lunchtime on the German left with PzIVs on both sides. Ian had some misadventures with no AA on table to prevent a Sturmovik strike, which was pretty devastating, and an even more devastating artillery bombardment, which destroyed a Panther platoon. Fortunately, Phils Jagdtigers stabilised the situation.
The fighting about to get messy between Romanians and their former German allies.
Dave's sector of the German front, note the T34s lined up in the middle distance. These were supposed to be sweeping around having despatched Ian and Dave's forces and rolling up Ben, Adam and yours truly. Unfortunately, the T34 commander hadn't had enough Vodka and steadfastly stood firm trading shots at a distance with the better armed German tanks. I suspect the NKVD will be making a visit soon.
Adam and Ben making a concerted effort to secure the objective by the big house on the road towards the left of the view, with Adams grenadiers having secured the ruined factory objective.
Final view of the ruined town that my grenadiers held, pretty much uncontested throughout the game.
All in all a fun game. Luke's plan could have worked well, but the T34s seemed reluctant to get stuck in and the brunt of the fighting fell to the Romanians. Phil's use of his heavy cats as a fire brigade worked really well and they were able to add stability wherever they were committed although they remain surprisingly vulnerable to artillery. A great game and a big thank you to all involved.
Thanks for looking.
Views of the battlefield looking towards the Soviet table edge, moving along the table from German left to right. The left flank, scene of some hot PzIV on PzIV action.
Centre of the table.
Ruined factory
German right flank with blitzed town
Looking along the table from the German right, Germans on left, Soviets on right.
The opposite end of the table.
The situation at lunchtime. Three turns in and the Romanians and Germans were having at it with relish on the German left, but Luke's cunning plan for the Soviets was to refuse the German right and make a concerted push on the German left and centre. This meant my Grenadier company was able to occupy the ruined town with ease and set up a PAK front with 88s and Adams PAK40s. Unfortunately, we had little to shoot at.
Lunchtime on the German left with PzIVs on both sides. Ian had some misadventures with no AA on table to prevent a Sturmovik strike, which was pretty devastating, and an even more devastating artillery bombardment, which destroyed a Panther platoon. Fortunately, Phils Jagdtigers stabilised the situation.
The fighting about to get messy between Romanians and their former German allies.
Dave's sector of the German front, note the T34s lined up in the middle distance. These were supposed to be sweeping around having despatched Ian and Dave's forces and rolling up Ben, Adam and yours truly. Unfortunately, the T34 commander hadn't had enough Vodka and steadfastly stood firm trading shots at a distance with the better armed German tanks. I suspect the NKVD will be making a visit soon.
Adam and Ben making a concerted effort to secure the objective by the big house on the road towards the left of the view, with Adams grenadiers having secured the ruined factory objective.
Close of play, with my grenadiers still having little to do, despite the late appearance of some lend lease Churchills and T34s to give me something to shoot at.
On the left flank, the fighting was intense, with lots of scrap metal to deal with after the war.Final view of the ruined town that my grenadiers held, pretty much uncontested throughout the game.
All in all a fun game. Luke's plan could have worked well, but the T34s seemed reluctant to get stuck in and the brunt of the fighting fell to the Romanians. Phil's use of his heavy cats as a fire brigade worked really well and they were able to add stability wherever they were committed although they remain surprisingly vulnerable to artillery. A great game and a big thank you to all involved.
Thanks for looking.
Sunday, 16 March 2014
Andreivian forces
I've finally wrapped up my forces for the upcoming gaming weekend in Dungworth this coming April. Set in the fictional Black Sea country of Andreivia, where local militias of Turkish and Armenian origins are about to struggle with each other for control of the capital city, Tcherbevan, with interference from "Russian" forces who want Andreivia to remain in their sphere of influence and NATO/UN "peacekeepers", who want Andreivia in theirs. Sound familiar? A case of life imitating art if ever there was one.
Anyway, representing the Andreivian Turkish forces, I have built up militia forces based on various manufacturers Taliban (Britannia and Underfire Miniatures) and Mujahideen (Mars plastics). At the front is a four man HQ group, two man spotter team, two three man mortar teams and an SPG-9. Behind them are four 6 man teams, all AK-47/74 armed, one with RPG-7 and one with a PK 7.62mm LMG. To the left are the mobile forces in "technicals" (base models courtesy of Tesco's and repainted by me) with a DShK AA MG, and SPG-9 and one transport for 6 AK-47/74 armed militants. These guys represent the Andreivian Liberation Army (ALA).
The "technicals" in more detail.
The militia - a colourful bunch.
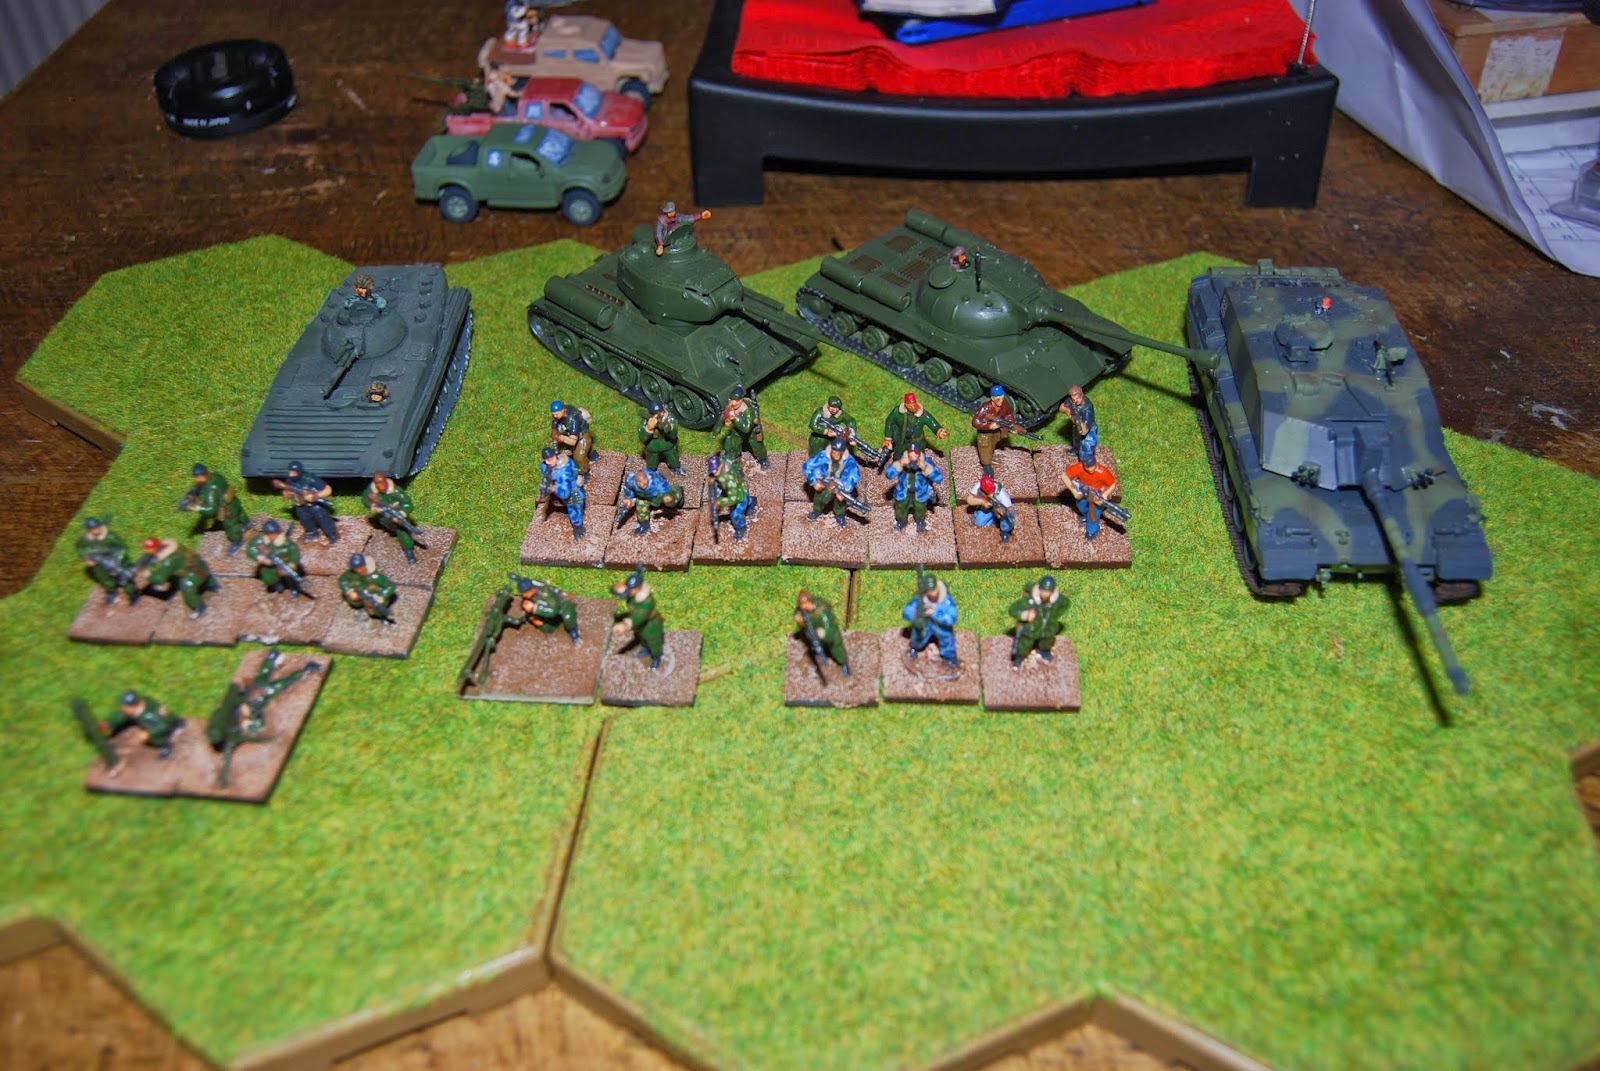
Fighting alongside the ALA forces are a more urban force, mainly ex-Soviet cold war heroes who are unsatisfied with the current attempts by Andeivians of Armenian origin to take control of the country. These guys are also armed with mainly ex-Russian equipment and they have also liberated some ex-Soviet hardware from armt reserve depots and even museums in order to get some armoured assets, which include a BMP-1, T34-85 and IS-3. There's also a Challenger, if I can persuade anyone that they managed to steal one from a NATO base.
The urban militia from the Anti-Armenian/Revolutionary Army Coalition (AA/RAC) comprise a three man HQ (including a beautiful, ruthless female sniper/assassin) with attached two man SPG-9 team. There are two teams of seven, all armed with AK47/74, each with one RPG-7, one LAW and one PK 7.62mm LMG. There's also a motorised team in the BMP-1 comprising another seven man team like the others, with a two man AT-5 Kornet/Spriggan ATGM team.
The mechanised BMP-1 team.
The leg infantry and armoured support.
Anyway, representing the Andreivian Turkish forces, I have built up militia forces based on various manufacturers Taliban (Britannia and Underfire Miniatures) and Mujahideen (Mars plastics). At the front is a four man HQ group, two man spotter team, two three man mortar teams and an SPG-9. Behind them are four 6 man teams, all AK-47/74 armed, one with RPG-7 and one with a PK 7.62mm LMG. To the left are the mobile forces in "technicals" (base models courtesy of Tesco's and repainted by me) with a DShK AA MG, and SPG-9 and one transport for 6 AK-47/74 armed militants. These guys represent the Andreivian Liberation Army (ALA).
The "technicals" in more detail.
The militia - a colourful bunch.
Fighting alongside the ALA forces are a more urban force, mainly ex-Soviet cold war heroes who are unsatisfied with the current attempts by Andeivians of Armenian origin to take control of the country. These guys are also armed with mainly ex-Russian equipment and they have also liberated some ex-Soviet hardware from armt reserve depots and even museums in order to get some armoured assets, which include a BMP-1, T34-85 and IS-3. There's also a Challenger, if I can persuade anyone that they managed to steal one from a NATO base.
The urban militia from the Anti-Armenian/Revolutionary Army Coalition (AA/RAC) comprise a three man HQ (including a beautiful, ruthless female sniper/assassin) with attached two man SPG-9 team. There are two teams of seven, all armed with AK47/74, each with one RPG-7, one LAW and one PK 7.62mm LMG. There's also a motorised team in the BMP-1 comprising another seven man team like the others, with a two man AT-5 Kornet/Spriggan ATGM team.
The mechanised BMP-1 team.
The leg infantry and armoured support.
Should be enough forces to last me the weekend for Crisis Point 2014, especially if we recycle casualty figures.
Thanks for looking.
Saturday, 15 March 2014
Flames of War game
Last Saturday a group of dedicated wargamers got together at a secret venue in Ellesmere Port to play Flames of War. Six players, each 2000 points of Late War Normandy lists. On the Allies right was Aiden with a British Infantry Company, in the centre Dennis with a mixed US armour/infantry list and lots of artillery and on the left Dave with a British armoured squadron. Squared up against this allied might was Phil on the German right with lots of Jagdtigers (Normandy!!!???), Rick with a PzIV armoured kampfgruppe and myself on the left of the line with an SS panzergrenadier company.
Dennis, the allies "El Supremo" briefs Dave on his defensive tactics - hide and, if he spots you, run - he is facing Jagdtigers after all. Meanwhile, Rick, aka Guderian, takes an oblique aerial shot from his Storch. View looking across the table, Germans deploying on the right, allies on the left.
Aiden, feeling a bit isolated, and ganged up on, on the allies right.
The might of a Panzergrenadier company supported by PzIVs, 88s and a 105mm battery, ready to start to contest the ruins on the German left.
The rear area of the Pzgrenadiers with a mortar platoon and 75mm IG section.
A nice solid firebase with a grenadier platoon hunkered down in the ruins, flanked by dug in 88s.
The objective farm sited along the boundary between my Pzgrenadiers and Ricks panzers, scene of some early attempts at coup-de-main by Aidens recce carriers.
The scene of my first successful close assault by a Gepanzert platoon, two of Ricks recce armoured cars lifted Aidens defenders gone to ground status allowing the Sdkfz 251s to eliminate them and take the objective.
The village on Aiden's flank with Dennis, the scene of Ricks wild PzIV ride and the furthest German advance of the day.
Unfortunately, in the heat of battle I neglected to take a more comprehensive set of photos. My Pzgrenadiers and Ricks Pzs ganged up on Aiden, significantly wearing down his forces. On the German right, Phils Jagdtigers advanced slowly on Dave's troops, surrounding themselves with burning Stuarts and Shermans. However, their advance was too slowand Dave's dogged resistance meant his sector scored highest for the allies. In the centre, Dennis's US artillery park was spectacularly ineffective, although his armour slugged it out with Ricks panzers, effectively neutralising both armoured forces. Dennis cleverly held the village objectives and infiltrated infantry through to contest German held objectives, thereby cutting a lot of victory points off the German total. On the German left, Rick and I held our objectives and took one of the ruined town objectives from Aiden, but his recce carriers kept the objective contested so no points there. Overall, the allies won a victory in terms of objectives held and contested, although at the cost of the loss of both British flank forces and a significant portion of the US armour in the centre. The German centre lost a lot of PzIVs and I lost my only PzIV troop (the first outing for my PSC PzIVs so no surprise at the poor first showing), but Phil's Jagdtigers were almost unharmed (loss of a Wirblwind section and one Jagdtiger only).
All in all a really fun game. After playing several games of FoW, I'm finally beginning to see the nuances and subtleties of the game. Still not sure how close to WW2 it is but it does give a fun game and the feel of the game is getting better for me. Thanks to all involved, especially Aiden for the scenario, Rick for the scenery and inviting me, and Phil for the venue.
Thanks to you too for looking.
Dennis, the allies "El Supremo" briefs Dave on his defensive tactics - hide and, if he spots you, run - he is facing Jagdtigers after all. Meanwhile, Rick, aka Guderian, takes an oblique aerial shot from his Storch. View looking across the table, Germans deploying on the right, allies on the left.
Aiden, feeling a bit isolated, and ganged up on, on the allies right.
The might of a Panzergrenadier company supported by PzIVs, 88s and a 105mm battery, ready to start to contest the ruins on the German left.
The rear area of the Pzgrenadiers with a mortar platoon and 75mm IG section.
A nice solid firebase with a grenadier platoon hunkered down in the ruins, flanked by dug in 88s.
The objective farm sited along the boundary between my Pzgrenadiers and Ricks panzers, scene of some early attempts at coup-de-main by Aidens recce carriers.
The scene of my first successful close assault by a Gepanzert platoon, two of Ricks recce armoured cars lifted Aidens defenders gone to ground status allowing the Sdkfz 251s to eliminate them and take the objective.
The village on Aiden's flank with Dennis, the scene of Ricks wild PzIV ride and the furthest German advance of the day.
Unfortunately, in the heat of battle I neglected to take a more comprehensive set of photos. My Pzgrenadiers and Ricks Pzs ganged up on Aiden, significantly wearing down his forces. On the German right, Phils Jagdtigers advanced slowly on Dave's troops, surrounding themselves with burning Stuarts and Shermans. However, their advance was too slowand Dave's dogged resistance meant his sector scored highest for the allies. In the centre, Dennis's US artillery park was spectacularly ineffective, although his armour slugged it out with Ricks panzers, effectively neutralising both armoured forces. Dennis cleverly held the village objectives and infiltrated infantry through to contest German held objectives, thereby cutting a lot of victory points off the German total. On the German left, Rick and I held our objectives and took one of the ruined town objectives from Aiden, but his recce carriers kept the objective contested so no points there. Overall, the allies won a victory in terms of objectives held and contested, although at the cost of the loss of both British flank forces and a significant portion of the US armour in the centre. The German centre lost a lot of PzIVs and I lost my only PzIV troop (the first outing for my PSC PzIVs so no surprise at the poor first showing), but Phil's Jagdtigers were almost unharmed (loss of a Wirblwind section and one Jagdtiger only).
All in all a really fun game. After playing several games of FoW, I'm finally beginning to see the nuances and subtleties of the game. Still not sure how close to WW2 it is but it does give a fun game and the feel of the game is getting better for me. Thanks to all involved, especially Aiden for the scenario, Rick for the scenery and inviting me, and Phil for the venue.
Thanks to you too for looking.
Subscribe to:
Posts (Atom)