Translate

Thursday, 24 February 2022

6mm Soviet megalomania

In a strange twist of fate, I found myself, like a certain presidential figure yesterday afternoon, reviewing my former Soviet equipment.  This for me was ahead of a game in a week or so of Battlegroup Northag using some modified stats for US Army and Marine Corps taking on Soviet VDV and a Motor Rifle Division.  The need for some BMD-1s meant I was looking through various boxes of vehicles and figures.  Unlike my real world counterpart, I put them all back in their boxes and went off to cook some dinner.

The results - all my Soviet kit is aimed at generating forces for the 1980's Cold War, specifically around 1985, although a lot of older kit and some newer kit inevitably have crept in.

BTR-50s, mainly, for Soviet engineers and doubling up as Polish Topaz apcs for their marines, until I pick up enough of the new H&R models. 


Various Soviet and NATO air assets.


BMP-1s and infantry, plus some MRLs.


T-62s and T-80s (at least I think they are T-80s), plus some bridging vehicles.


T-64s, BTR-50s and some VDV or Polish marine special forces.


BTR-60s and Tunguska AAD vehicles.


T-64s, mostly.


T-62s and various command options.


Various engineers vehicles and some assorted radar vehicles.


Infantry and more ?T-64s.


BMD-1s and ASU-85s plus assorted artillery and apcs.

Now, when I've plucked up the courage, I shall have a look through the unpainted lead pile of shame, which I know contains a lot of Soviet kit, plus more Brits, West Germans and US equipment.  Then, of course, there's the new pile of 3d printed kit, which has again come to a temporary halt while I overcome the next challenge of resin curing on the LCD screen, although output up to last weekend has tripled the amount of unpainted resin I have waiting for attention.  I have made a start on painting some of the prints while I explore methods to get the resin off the screen.

As ever, thanks for looking.

Monday, 31 January 2022

Something of a pleasant distraction

 I lost the painting mojo before Christmas and was quite wrapped up with getting some games in at the club, including a big Saturday gaming day, as well as attending the Recon show in Pudsey, Leeds.  Having seen the output from my chum Will McNally's 3D printer, I decided to take the plunge and rather than asking for models this Christmas, I asked my wife for a 3D printer.  She managed to get me an Elegoo Mars 2 during one of the periodic/episodic Amazon price reductions, plus a bottle of grey resin.

Christmas morning, I opened the box, read the instruction manual and carefully placed everything to one side until I'd picked up some isopropyl alcohol and borrowed a uv resin curer from work.  This weekend I was ready.  Friday afternoon we set up the machine - looks more complicated than it turned out to be, 1/3rd filled the tank with resin and loaded Chitubox (or whatever its called) on the PC.  I'd already farmed various sites for stl files, mainly M Bergman and Tigerace1945, both of which produce some seriously useful files.

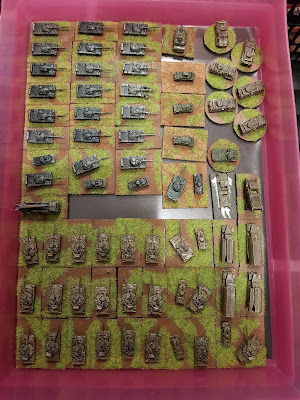
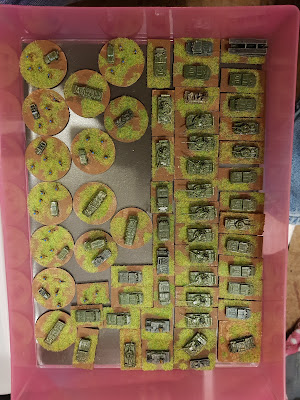
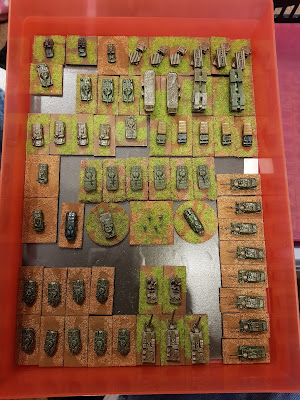
I then started producing 15mm armour, faster than the tractor factories of Chelyabinsk.  We have played a lot of Battlegroup Northag at the club recently, which encourages whole companies of T-62s and T-64s to be deployed.  I started out with a test T-64B hull and turret, which came out very nicely using the stl file and autoplatform and supports using Chitubox's default settings.  Sadly, I forgot to print the little MG cupola, so finished up batch printing a few of them.  Full of confidence, I then sliced two hulls and turrets, printing them in pairs, which also worked well.


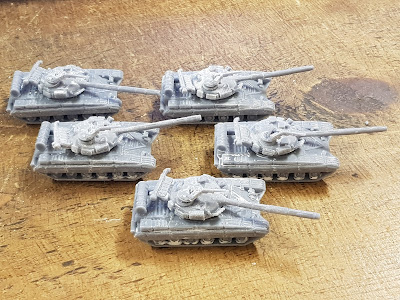
That gave me a troop of T-64Bs in 15mm scale, so I got to work on a platoon of BMP-1s for infantry support.  Hull and turret, these were formatted for two of each on each print run.


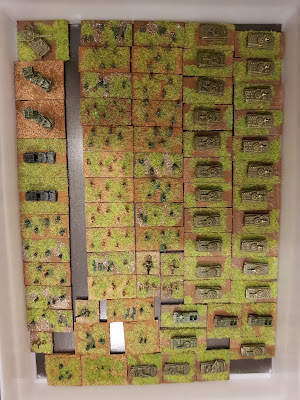
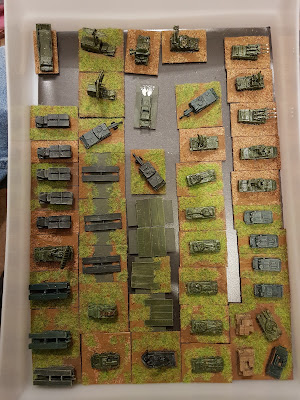
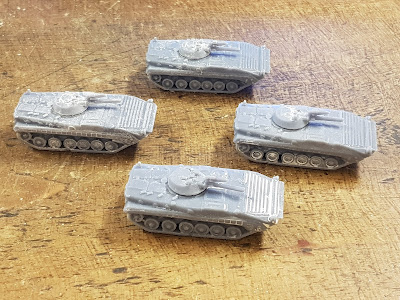
I then experimented with a few WW2 models in 15mm, an early or mid-war Dorchester ACV, an SdKfz 9 Famo recovery vehicle, an armoured jeep and a Pz-35t.  Still some clean up of the supports needed on the Dorchester wheels.


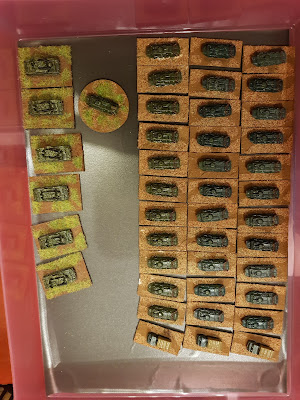
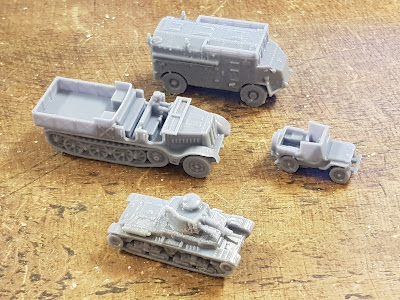
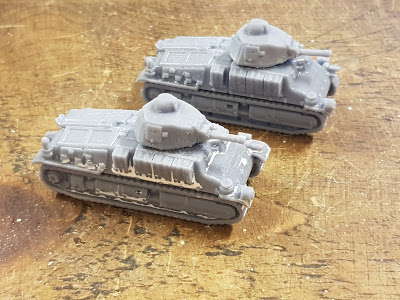
These French Somuas were upscaled to 1/72 from 1/100 using an online scale conversion that I found on Google and seem to have worked out well.  Another two part model, hull and turrets.


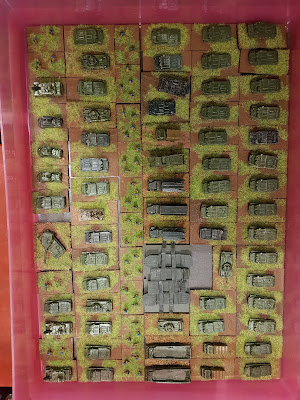
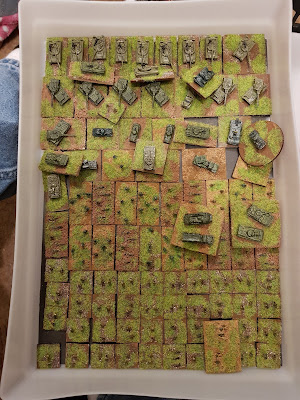
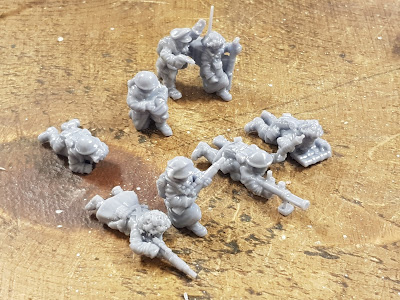
Finally, for now, I decided to try out the 3D Breed WW2 infantry and bought their set of winter British and Commonwealth infantry.  Each set comes with 15mm and 28mm figures with supports already added, as well as a set of 28mm figures without supports.  I found that I preferred cleaning up the figures when I'd allowed Chitubox to add supports, rather than those that came with the figures.  Below is the HQ set at the back (officer, kneeling RTO, and medic), back left is the spotter for a Bren gunner (sadly the bren gun snapped and I couldn't repair it, so he will be part of a mortar/artillery spotter team).  In front is a sniper team and PIAT team.


So, what did I learn?

Setting up the printer was a lot simpler than it appeared.

Don't overfill the resin tank, the plate drops into it when the printing starts and if over a third or so full, the resin can spill over the edges of the tank.

If the resin runs low during a print, there is a pause option, the model rises out of the resin and there is space to top up with some additional resin, but don't overdo it - see point above.

Cleaning up is hard in a domestic environment when you're spraying isopropyl alcohol everywhere, when the civil power comes in and says "what's that smell?".

Freeing the models from the base and supports is a combination of skilled snipping and brute force ripping, best done before the models have time to fully harden off.

Freeing the models from the base plate is best done with a plastic spatula before the models harden off,  The models often ping off unexpectedly and can fly a surprising distance, while the edge of the base plate is surprisingly sharp when contacted by unwary fingers!

Models need to be well washed, so water soluble resin is more practical.

Resin curing time makes a huge difference to print rates and can make printing 4 or 5 times longer with slower curing resins.

As the uv source can access the whole of the print bed, there is no difference in print times between printing one model per run and multiple models - as many as can fit on the bed.

When adding multiple models on the bed, it is better to allow enough separation for the supports, so that each model is separate - if they are too close, they print as one large piece of plastic, which means more work to clean up.

All snipping off of supports is best done before hardening, as the resin becomes quite brittle and can easily snap in the wrong places.

Final hardening was done using a very inexpensive uv source sold as a curing station for acrylic finger nails.

Bergman's model tanks are lovely, but you either have to slightly reduce the turret size before printing or file them down, which is what I did, but filing releases resin dust, which I wouldn't want to encourage without suitable protection.

I intend to minimise the amount of clean up, especially of the resin tray and its thin clear plastic film base, by planning batches of printing to make use of rainy weekends and bank holidays.  Resin can be left in the tank for short periods, but the longer it is left, the more likely it is that the resin will start to cure on the liquid, or even worse, adhere to the thin film on the base of the tank.

Thanks to all those kind souls who have shared really cool stl files for such a wide range of things, many of which aren't made by commercial manufacturers.  If anyone has a link to an Achilles SPAT stl file, that is one that I couldn't track down over the last few weeks.

As ever, thanks for looking and a belated happy new year.

Monday, 1 November 2021

15mm Battlegroup Northag club game

Saturday saw a club gaming weekend organized by Dave.  Ben, Mick and I were Soviets, exploiting a breach in the British (BAOR) lines stormed in a game at the club a few weeks back.  Soviets were advancing on table from the bottom of the view shown, crossing the fordable stream and attempting to push off the opposite table edge.  Lots of open ground to cross but precious few places for the BAOR to hide (Ian, Piers and Phil).  A pair of timed artillery strikes were positioned on the red X's on turn 1, in an attempt to catch any forward screen ATGMs or tanks deployed in the woods on the right or around the crossroads.  As it was, these strikes killed a Scimitar recce tank and pinned a deployed Milan team and Blowpipe team, and spilled some tea in dug in Chieftains.


An SAS demo team had wired the bridge with C4, but the British CO obviously didn't trust his specialists as he made the bridge the scene of a timed Harrier strike, which gapped the bridge arch and pinned the SAS team.  As the Soviet horde advanced, the SAS recovered morale and bugged out, just before a Jaguar strike aircraft dropped its load or iron bombs on the far side of the bridge, KO'ing a recce T-62 hiding there.  Meanwhile, the Soviet vanguard wasted no time in closing up to the river and wading through the gravel and mud. 


BAOR CO looking worried.  His 3 forward screen Chieftains nearest the road have been reduced to 2 through a catastrophic breakdown, while his vanguard Chieftain troop has moved and fired, with very limited success.  In the distance (off camera to the right) the Soviet T-80 vanguard rumbles forward.


T-80s catching up with their older, less capable T-62 buddies.


Two of the vanguard Chieftains are burning, taking tank losses to 3 for the BAOR.  Any further losses will equate to 2 chits per vehicle rather than a single chit.


Moving in for the kill, T-80s and BMPs cross the stream en mass.  ATGM armed BRDMs wait on ambush fire on the hillock to the right and take the opportunity to fire at the BAOR CO when his Chieftain attempts to engage - BOOM!  2 chits for CO loss and 2 more for 4th Chieftain destroyed.


Soviet reserves in the form of a Hind flight arrive.  In the first round, ATGM fire brews up another Chieftain, as does a long range shot from a T-80.  A BAOR reserve mechanised infantry platoon rushes forwards in the far distance and disembarks into the little patch of woods next to the road, clearly forgetting the need to disperse in case of artillery or air attack.  The Hinds punish them with rocket pods, destroying them as a fighting force and bringing the game to an end pushing the BAOR through their break point.


So, the Soviet war machine continues to rumble forwards having KO'd two troops of Chieftains and a full mechanised infantry platoon, plus some odds and ends of recce vehicles.  Admittedly, the T-62 company has been reduced to a platoon and one of the T-80s was lost, but the Soviets considered casualties light given the amount of open ground they needed to cover.  For big games, the points for a recovery vehicle could be well spent and artillery, air and helo assets are worth their weight in gold when up against a Chieftain heavy opponent.

A great game, looking forward to the next one in December.  Thanks for looking.

Friday, 22 October 2021

Setting the East Ablaze Dunsterforce game

Will, Ian, Andrew and I played out a game of Setting the East Ablaze at the club last night.  We opted for scenario 1 from the Adventures of Dunsterforce Supplement, with the British sending an Indian Army force northwards through Persia in an attempt to head off an Ottoman army heading for Baku and its' oilfields.  A large game, 8 units of Cossack infantry, 2 of Cossack cavalry and a unit of British Hussars, supported by HMGs and mountain guns and a Martinsyde ground attack aircraft, taking on 12 large units of Jungali irregulars, supported by HMGs.  Dunsterforce entered on the road to the left of the photo below and had to skirt or go over the ridge in the foreground, to reach the bridge and cut off the Jungali retreat/reserves.  Troops and terrain are all from Will's collection.


Detail of the river and crossing (totally unlike the real bridge) with chopped up matting representing scrub along the river banks and at the foot of the stone scattered ridge.


The Jungalis or Junglies as British troops referred to them, dug into shallow trenches and rifle pits on the banks of the river and took to ground in the scrubby areas and amongst the rocks on the ridge (hidden from British airpower).


Said British air power, here a Spowith Camel, representing a flight of 2 Martinsyde aircraft.


View from the Martinsyde at the end of turn 1.  The combined Cossacks and tiny British contingent are advancing either side of the road, mounted Cossacks and British armoured cars advancing around the Tea House near the curve in the road.  Cossack infantry form a densely bunched mass attempting to push up onto the ridge.  The Jungalis have triggered their ambushes, with one spectacularly successful ambush routing a Cossack infantry unit (dead are piled on the hilltop lower left).  Jungali reserves pile over the bridge (lower right) to form a conveyor belt feeding fresh natives onto the ridge to hold off the Cossacks.


Jungalis facing the stiff upper lip of dismounted Hussars, bolstered by a Lewis LMG.


The Cossacks still bunched up.  The two chaps in front of their main body are routing.


After a second round of play, another Cossack infantry unit has broken on the run up the hill.  However, Jungali ranks on the hill top have been spread thin, but help is on the way as reserves are fed forwards.


A big Jungali highpoint was almost wiping out the British Hussars, although they managed to pass all but one morale test, leaving them pinned.  The British armoured cars were determined to wipe out the Jungali HMG team at the end of the ridge.


Cossack mountain artillery pounded the Jungalis on the ridge nearest the camera, thinning them out considerably, but they were holding on for now.


This was a very large scenario and we were very ambitious trying it out in an evening.  However, it did let us practice using a variety of troop types, as well as artillery, airplanes and armoured cars.  The scenario looks to be a tough nut to crack for the British/Cossack forces and the Jungalis were holding their own at the end having done for 2 units of Cossack infantry and the British Hussars.  Still some questions to iron out in the rules and need to get more familiar with the rules, but lots of potential and a fun and attractive looking game.


Thanks for looking.

Saturday, 16 October 2021

Cold War Commanders Grimsby Game 2021 Sunday action

 Sunday saw the Soviets regroup for another bite at NATO.  In front of the USMC one BMP battalion withdrew completely, while a second, now reduced to little more than a company) took up concealed positions around fields and hedgerows.


Sea Cobras patrolling aggressively.


The Soviets were still plagued by poor command rolls, which meant their tank battalion eventually moved on table alone.  Intentions were revealed, when it swung away to the west (USMC left flank), but not before TOW-1s and a strike from an A-9 Intruder (10 attacks - reduced to 9 by one unsaved AAA hit) took out half the available armor.  This was a first for the marines and an Intruder strike is something to behold.


Unfortunately, the M60s tried to move laterally from woods on right to those on the left, under cover of a Soviet smoke barrage, but sadly failed a vital command roll and were reduced to one running tank platoon.  Time for the Dragons to earn their keep and two stands can be seen advancing into the woods to bolster up the left flank and support British 1st infantry. 


The empty terrain in front of the marines right flank - oh for some mobile reserves.


Over on the left, the remaining tank and Dragon teams made slow progress, while a follow-up Soviet BMP infantry battalion swings down the road in the distance, heading for the crumbling British defences off screen to the left.


What's left of the Soviet tank battalion and newly arrived BMP battalion still struggling to gain any momentum with poor command rolls.


By the end of play, a combination of long range ATGMs from USMC Tows, Sea Cobras and air strikes from Corsairs, Intruders, and Kriegsmarine Tornados, but mainly poor command roles, meant that the Soviets facing the marines were late to the party (top right in picture below).  However, Steve, the next Soviet player had got to close range and was systematically destroying what was left of British 1st Divisions Chieftain and Milan assets.  Although there could still be some costly engagements with British infantry in the town, it was felt that the Soviets had achieved a breakthrough.  In hindsight, I could have broadened my left flank and taken up some of the pressure on the Brits sooner by moving my infantry into the fields and trees to the right of the view below (2 Dragon teams and an M60 weren't enough), but at leg infantry speeds, could they have moved fast enough?


Sadly, the M60 and Dragons couldn't inflict enough pain on the armor to stop them, although they had been reduced to 50% strength, thanks largely to the Intruder strike.


All in all a great couple of days gaming played with some old and some new friends.  My AAR really only reflects what was happening on the extreme NATO right wing.  Over on the left, Mark's Danes had a torrid time from Andy and Stewart's Soviet Spetsnaz and Marines.  Next to them, Andy's German panzergrenadiers had stood up to severe pressure from repeated suicidal close assaults from Soviet infantry, so much so that their commander Ianski was visited by comrade Makarov on the Saturday night and a new version Ianski 2 appeared on Sunday, only to see his force virtually wiped out again.  Between the Germans and Americans, Chris' British stood up to huge pressure, wiping out the first of Steve's Soviet wave, albeit at great cost in materials if not in infantry, only to be overwhelmed by the Soviet second wave.  The US marines had kept Martin's Soviets at arms length on day 1 and reduced the effectiveness of 2 BMP battalions to a single company, mainly due to command rolls preventing the Soviets from getting going.  Martin's Soviets eventually made it to support Steve's attack on the Brits and I didn't move enough strength soon enough to be able to support the British.

Loads of fun, some cracking banter, good food and a few beers.  In total I think it was 11 game turns played, which says a lot about the players (new players picked up the mechanics really quickly) and the spirit the game was played in, but also the restriction of forces to brigades (or parts of) with suitable supports.

Wednesday, 13 October 2021

Cold War Commanders Grimsby Game 2021 Saturday action

Saturday gaming kicked off with a couple of gratuitous shots;

A pair of F-14 Tomcats flying CAP skipped across the USMC deployment area at high speed.


Followed by the more sedate drone of a Shackleton ECCM aircraft operating out of RAF Lossiemouth.


Deploying at high speed, one marine infantry battalion raced into the village on the right flank of the USMC frontage, leaping out of their LVTP-7s and sheltering in the relative safety of the built up areas.


On the USMC left flank, the other USMC infantry battalion made a firebase from the village, while the M60-A1 tank squadron (all 4 stands) took up positions to fire on the advancing Soviet BMP-1 infantry battalions - these seemed to be ignoring the USMC right flank.


The BMPs trundled forwards relatively slowly, due to some awkwardly high command rolls.


But once up close to the M60 squadron, they were given what for.  The second BMP battalion can be seen fanning out around the fields in the right distance.


So far so good.


Tow 1 unit shooting diagonally across the table into the Soviet flank.  There used to be three more units, but a command blunder wiped them out.  Command blunders plagued both sides on the eastern flank, fortunately more so for the Soviets that the marines.


View looking west from USMC end of the table, both Brits and Germans are hard pressed with close assaults going in, while the Danes at the far end are given something of a pasting.


Soviets eventually call in smoke to mask the M60s.  The two closest M60s have been driven back by ATGM fire from the Soviets.


Marine infantry on the right wondering if they should redeploy using their helicopter assets.


Sea Cobras arrive to bolster the marines.


The first day ended with me feeling relatively content that the marines had managed to keep the Soviets at arms length.  The Soviets were really unlucky with command rolls, especially for their tank reserves which were released late in the day.  The Sea Cobras seemed to be having a good effect and NATO air strikes were fun, with the MAW available, there were A-9 Intruders, Corsairs, Harriers, Phantoms and even some Kriegsmarine Tornados, which proved very effective early on.  Already though, it appeared the Soviets were looking to concentrate on the gap between the USMC and British 1st infantry.