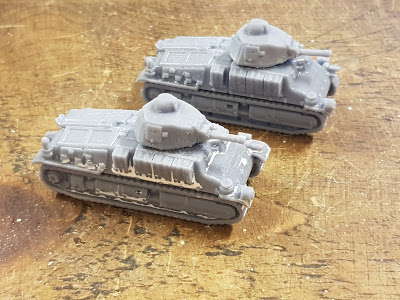
I lost the painting mojo before Christmas and was quite wrapped up with getting some games in at the club, including a big Saturday gaming day, as well as attending the Recon show in Pudsey, Leeds. Having seen the output from my chum Will McNally's 3D printer, I decided to take the plunge and rather than asking for models this Christmas, I asked my wife for a 3D printer. She managed to get me an Elegoo Mars 2 during one of the periodic/episodic Amazon price reductions, plus a bottle of grey resin.
Christmas morning, I opened the box, read the instruction manual and carefully placed everything to one side until I'd picked up some isopropyl alcohol and borrowed a uv resin curer from work. This weekend I was ready. Friday afternoon we set up the machine - looks more complicated than it turned out to be, 1/3rd filled the tank with resin and loaded Chitubox (or whatever its called) on the PC. I'd already farmed various sites for stl files, mainly M Bergman and Tigerace1945, both of which produce some seriously useful files.
I then started producing 15mm armour, faster than the tractor factories of Chelyabinsk. We have played a lot of Battlegroup Northag at the club recently, which encourages whole companies of T-62s and T-64s to be deployed. I started out with a test T-64B hull and turret, which came out very nicely using the stl file and autoplatform and supports using Chitubox's default settings. Sadly, I forgot to print the little MG cupola, so finished up batch printing a few of them. Full of confidence, I then sliced two hulls and turrets, printing them in pairs, which also worked well.
So, what did I learn?
Setting up the printer was a lot simpler than it appeared.
Don't overfill the resin tank, the plate drops into it when the printing starts and if over a third or so full, the resin can spill over the edges of the tank.
If the resin runs low during a print, there is a pause option, the model rises out of the resin and there is space to top up with some additional resin, but don't overdo it - see point above.
Cleaning up is hard in a domestic environment when you're spraying isopropyl alcohol everywhere, when the civil power comes in and says "what's that smell?".
Freeing the models from the base and supports is a combination of skilled snipping and brute force ripping, best done before the models have time to fully harden off.
Freeing the models from the base plate is best done with a plastic spatula before the models harden off, The models often ping off unexpectedly and can fly a surprising distance, while the edge of the base plate is surprisingly sharp when contacted by unwary fingers!
Models need to be well washed, so water soluble resin is more practical.
Resin curing time makes a huge difference to print rates and can make printing 4 or 5 times longer with slower curing resins.
As the uv source can access the whole of the print bed, there is no difference in print times between printing one model per run and multiple models - as many as can fit on the bed.
When adding multiple models on the bed, it is better to allow enough separation for the supports, so that each model is separate - if they are too close, they print as one large piece of plastic, which means more work to clean up.
All snipping off of supports is best done before hardening, as the resin becomes quite brittle and can easily snap in the wrong places.
Final hardening was done using a very inexpensive uv source sold as a curing station for acrylic finger nails.
Bergman's model tanks are lovely, but you either have to slightly reduce the turret size before printing or file them down, which is what I did, but filing releases resin dust, which I wouldn't want to encourage without suitable protection.
I intend to minimise the amount of clean up, especially of the resin tray and its thin clear plastic film base, by planning batches of printing to make use of rainy weekends and bank holidays. Resin can be left in the tank for short periods, but the longer it is left, the more likely it is that the resin will start to cure on the liquid, or even worse, adhere to the thin film on the base of the tank.
Thanks to all those kind souls who have shared really cool stl files for such a wide range of things, many of which aren't made by commercial manufacturers. If anyone has a link to an Achilles SPAT stl file, that is one that I couldn't track down over the last few weeks.
As ever, thanks for looking and a belated happy new year.


Look on Tigerace's Allied Tank Destroyer pack for the Achilles. Hopefully I'll be back on Thursday to see the first fruits of your addiction.
ReplyDeleteWill
Cheers Will, I'd already downloaded the M10 directory, but for some reason didn't expect to find the Achilles there. Printed one off this evening - it's a nice model, just needs crew.
DeleteExcellent beginnings Mr C 👍
ReplyDeleteThanks Mr P.
ReplyDeleteThe Chelyabinsk tractor works has come to a temporary halt as I try to work out how to reset the home setting for the z axis. I had an issue with a piece of resin in the tank that threw the plate out, but I can't seem to get the machine to reset properly. Not before a full company of T-64s had rolled out of the factory though.
Cheers, Andy
Oh dear 😞 fingers crossed it's just a short halt to production or you'll be summoned to Mr Makarovs office 😂😂
ReplyDelete